Required packages
NSR - Screen Recorder contains all the files you need to work. You do not need additional packages or tools to use the plugin.
Features
High-Speed:
Engineered and extensively optimized for superior performance.
Capture Everything:
Capture any visual content that can be transformed into a texture, whether it's a gaming interface, user interface, camera feed, or texture.
Tailored Resolutions:
Capture videos with resolutions as high as Full HD (1920x1080) or even higher if your device supports it.
Augmented/Virtual Reality Support:
The package provides complete compatibility with ARFoundation, ARCore, ARKit, Vuforia, and OpenXR.
Concurrent Recording:
The package ensures thread safety, enabling recording in worker threads to enhance performance even further.
Lightweight Integration:
The API is purposefully designed to minimize unnecessary additions or extra burden on your project.
Components:
| Universal Video Recorder |
The main component that creates a connection between the Unity Engine and the screen recording plugins (Android & iOS & macOS & Windows). |
| Screen Recorder |
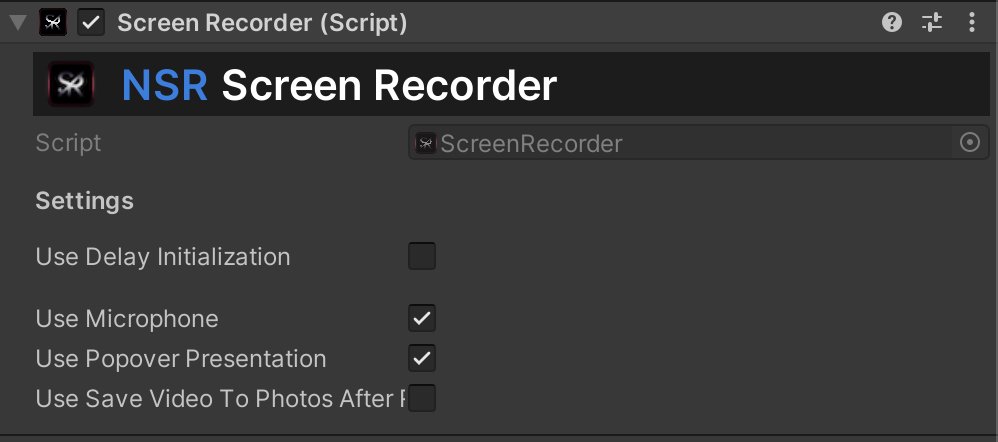
The main component that creates a connection between the Unity engine and the screen recording framework. (Only iOS!) |
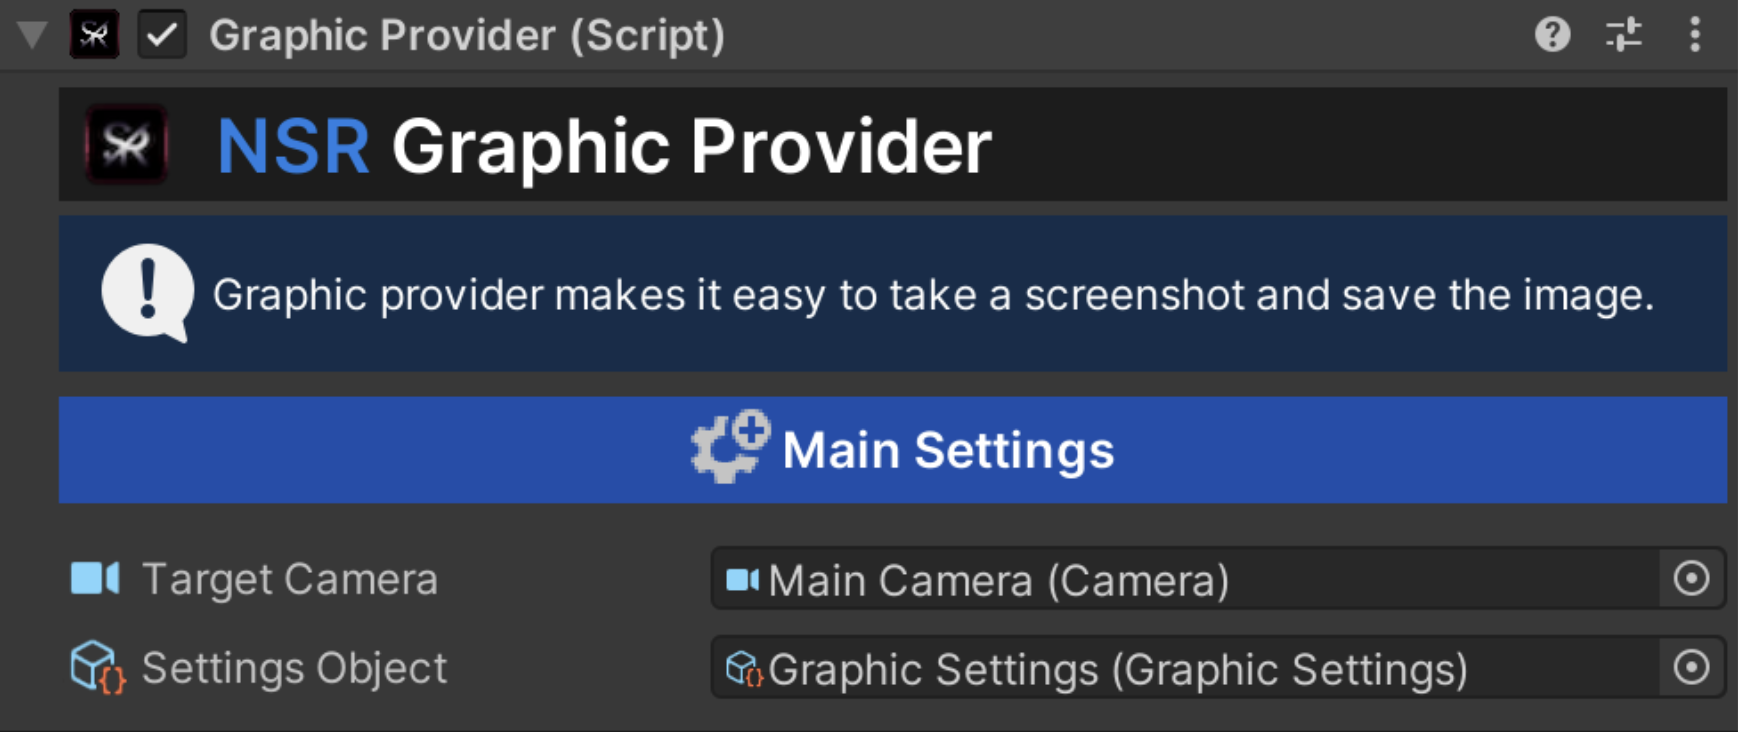
| Graphic Provider |
The main system that manages subsystems, parameters, and the way images are created and saved. |
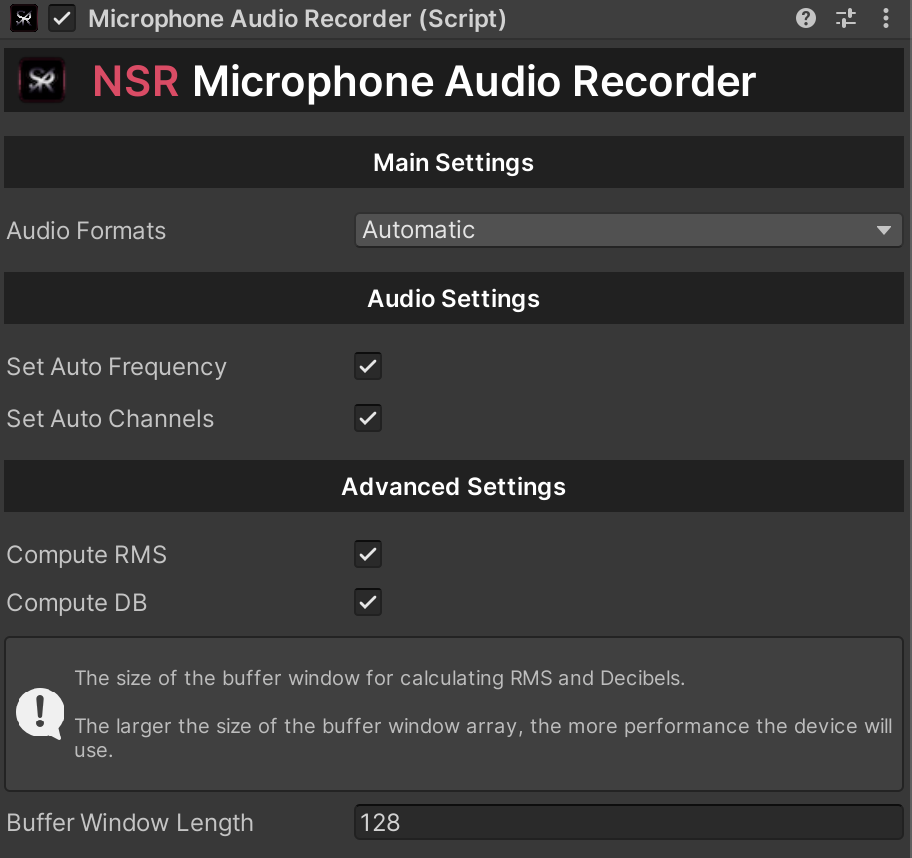
| Microphone Audio Recorder |
A component that creates a connection between the Unity Engine and audio recording plugins and provides the ability to create audio files (Android & iOS & macOS & Windows). |
Platform support
NSR - Screen Recorder is a cross-platform solution that supports most popular platforms.
iOS/iPadOS version:
Android version:
MacOS version:
Windows version:
Meta Horizon OS version:
Note
To record video in Unity Editor, we use native Unity tools that have been available since Unity 2021.2+.
Limitations
NSR - Screen Recorder has no limitations, all restrictions (resolution of the recorded video) depend on the system on which you plan to create the project.
Samples
| NSR - Screen Recorder_Universal |
An example of a scene that demonstrates how the plugin works with Universal Video Recorder and basic settings. |
| NSR - Screen Recorder_Dynamic |
An example scene that demonstrates how the plugin works with a Universal Video Recorder and a dynamic example scene. |
| NSR - Screen Recorder_iOS_Internal |
An example of a scene that demonstrates how the plugin works with iOS Screen Recorder and basic settings. |
| NSR - Screen Recorder_SimpleCamera |
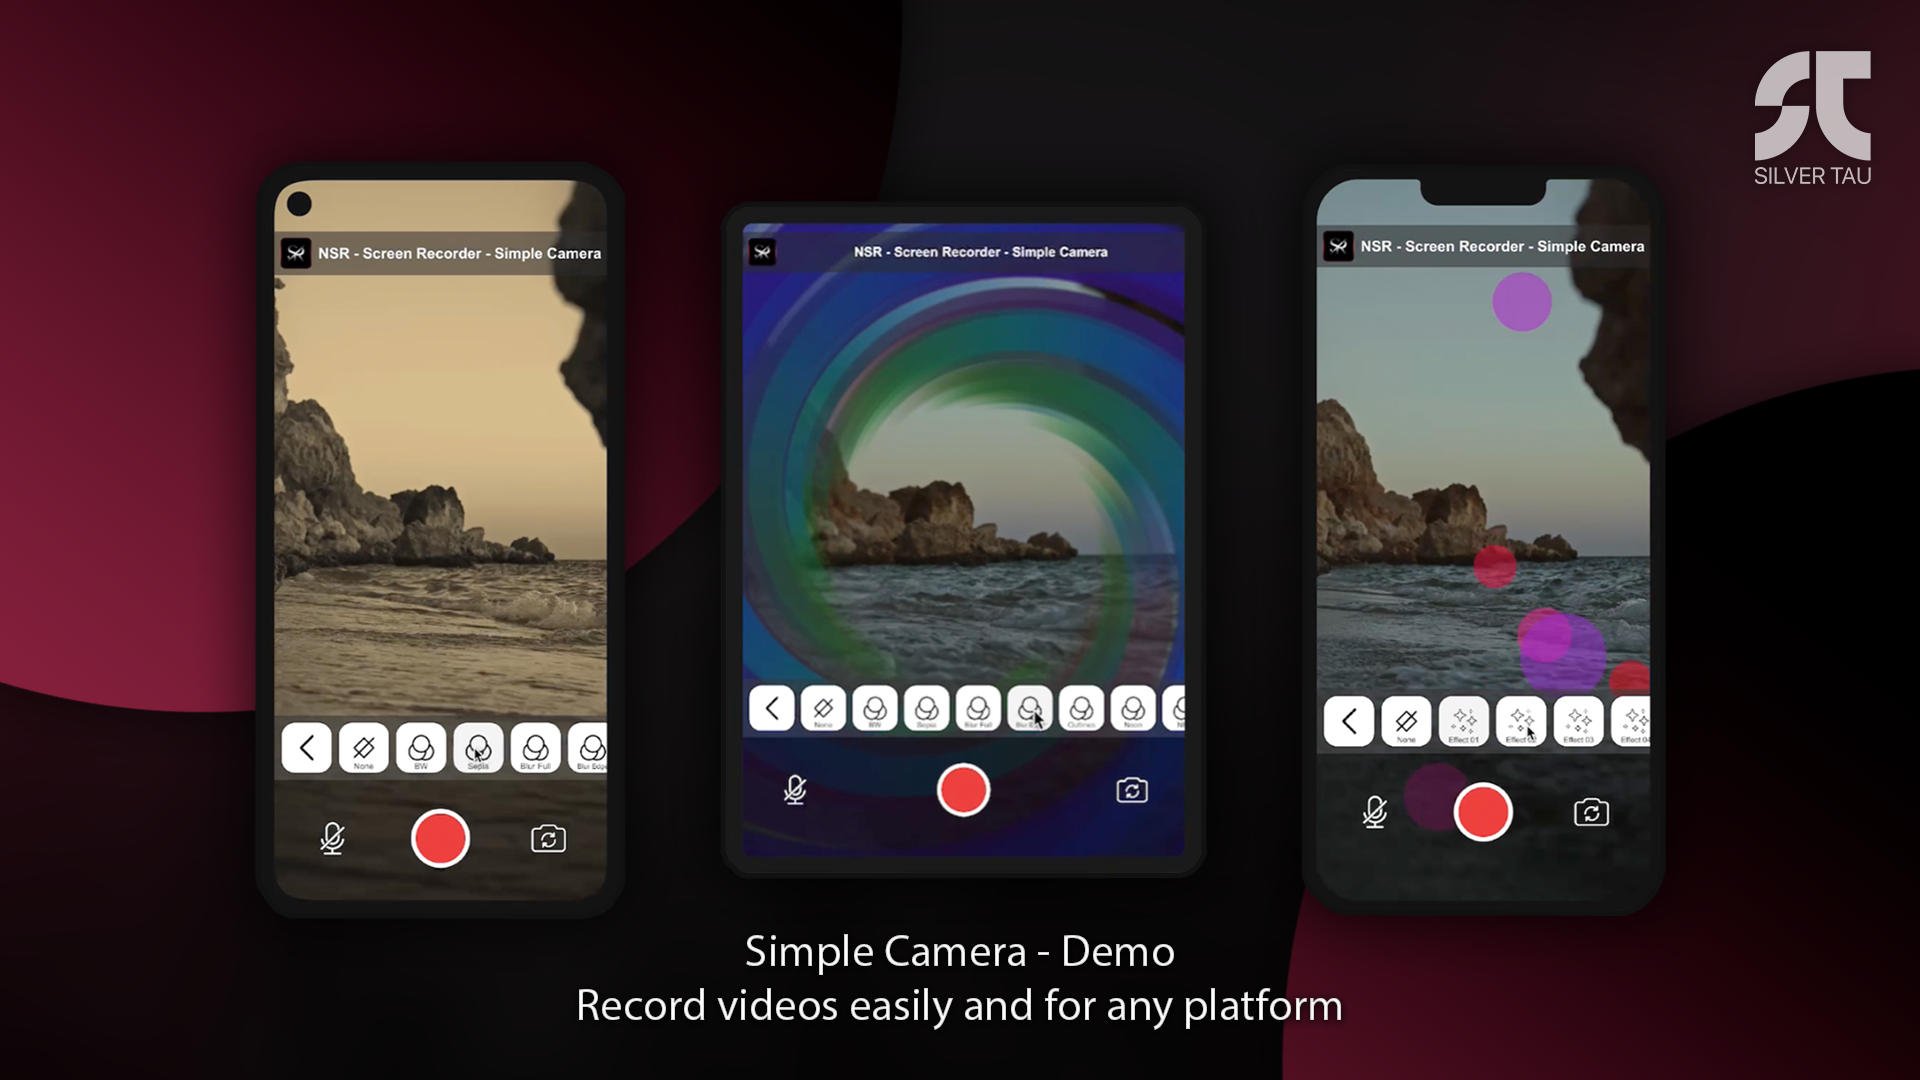
An example of a scene that demonstrates how the plugin works with a Universal Video Recorder and a simple implementation of the device's camera image. |
| NSR - Screen Recorder_Audio |
An example of a scene that demonstrates how the plugin works with a Universal Video Recorder and audio sources. |
| NSR - Screen Recorder_RenderTexture |
An example of a scene that demonstrates how the plugin works with a Universal Video Recorder and RenderTexture. |
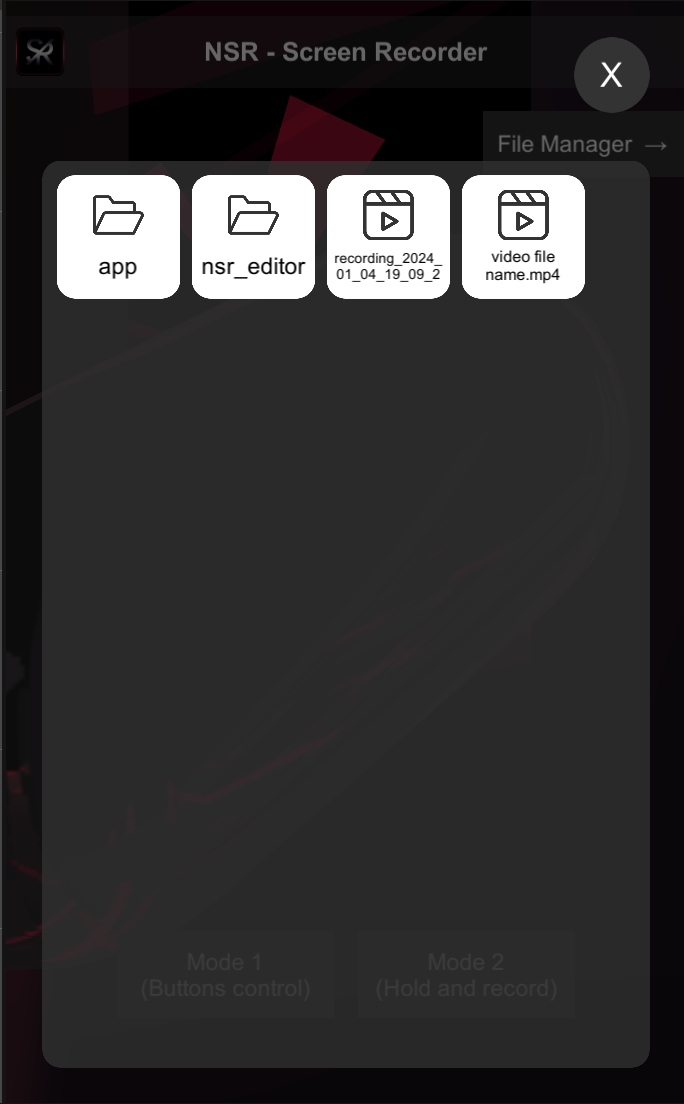
| NSR - Screen Recorder_FileManager (Share_SaveToGallery) |
An example of a scene that demonstrates how the plugin works with a custom file manager and the share & save to gallery utilities. |
| NSR - Screen Recorder_Record UI |
An example of a scene that demonstrates how the plugin works with the ability to record UI or not. |
| NSR - Screen Recorder_Audio_Only |
An example of a scene demonstrating the operation of a plugin with the ability to record an audio file for a build app. |
| NSR - Screen Recorder_Dynamic Camera Changes |
An example of a scene that demonstrates how the plugin works with the ability to dynamically switch cameras when recording video. |
| NSR - Screen Recorder_MultiScene |
An example of a scene that demonstrates how the plugin works with the ability to record video for multiple scenes. |
| NSR - Screen Recorder_Watermark |
An example of a scene that demonstrates how the plugin works with the ability to add a watermark. |
Install NSR - Screen Recorder
To install NSR - Screen Recorder, simply import the package into your project.
Starting with Unity 2023.1+, the engine provides the option to select the application entry point for the Android platform. We recommend using Activity, but the plugin is compatible with both options (starting with version 2.0.1).
Note
Make sure that the "Add to embedded binaries" option is enabled for the SilverTau_NSR.framework, NSR.framework and the SilverTau_NSR.bundle library in the editor inspector. (iOS/iPadOS/macOS)
Scene setup
Each scene in your application must have one mandatory GameObjects: Universal Video Recorder (Cross-platform) or Screen Recorder (iOS/iPadOS).
GameObject Universal Video Recorder (Cross-platform) or Screen Recorder (iOS/iPadOS) initializes and controls the plugin's actions on the target platform If one of these GameObjects is missing from the scene, video recording will not work properly.
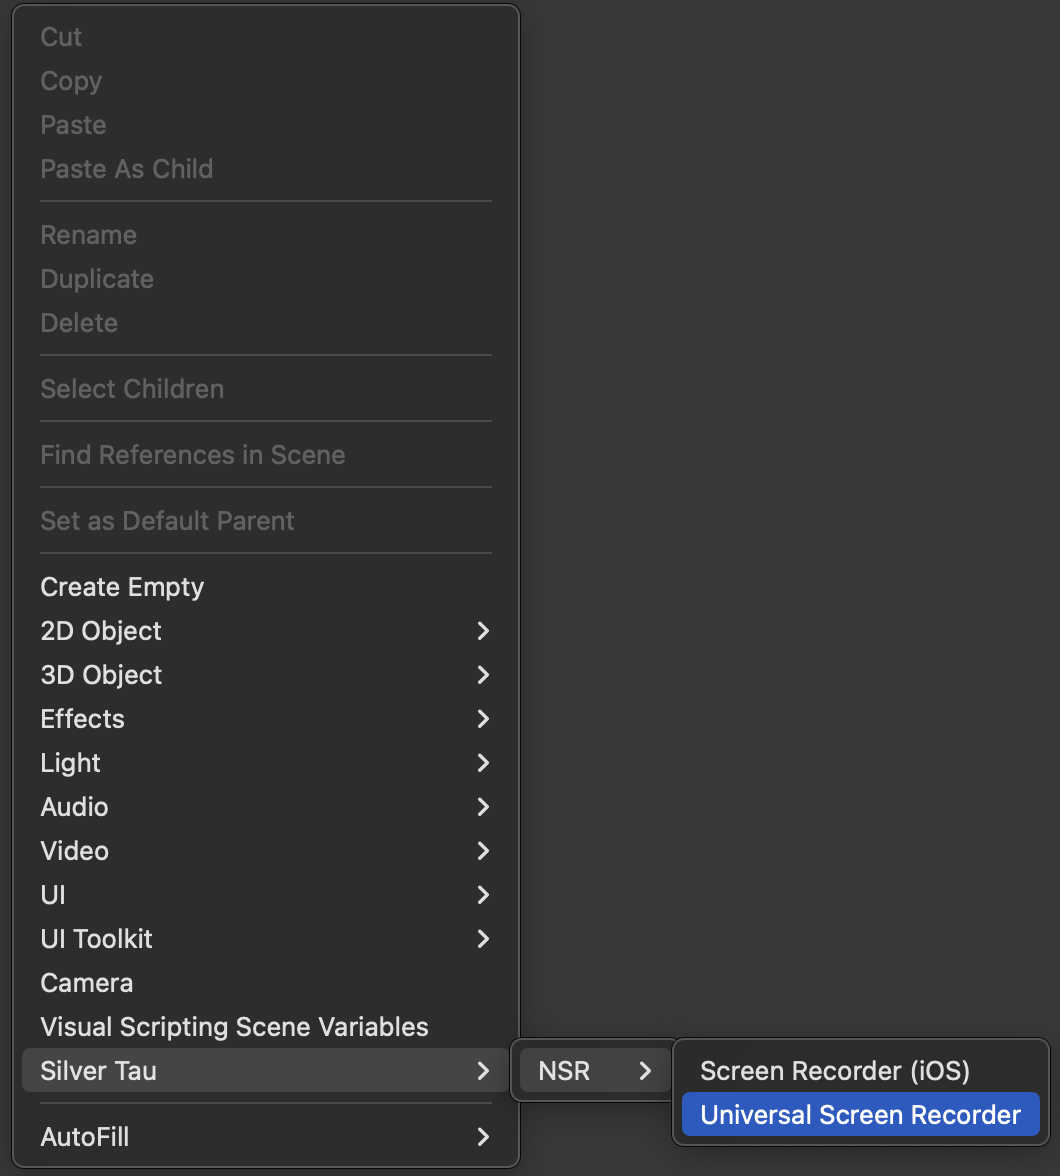
To create a Universal Video Recorder (Cross-platform) or Screen Recorder (iOS/iPadOS), right-click in the Hierarchy window and choose one of the following options from the shortcut menu.
Silver Tau > NSR > Universal Video Recorder or Screen Recorder (iOS)
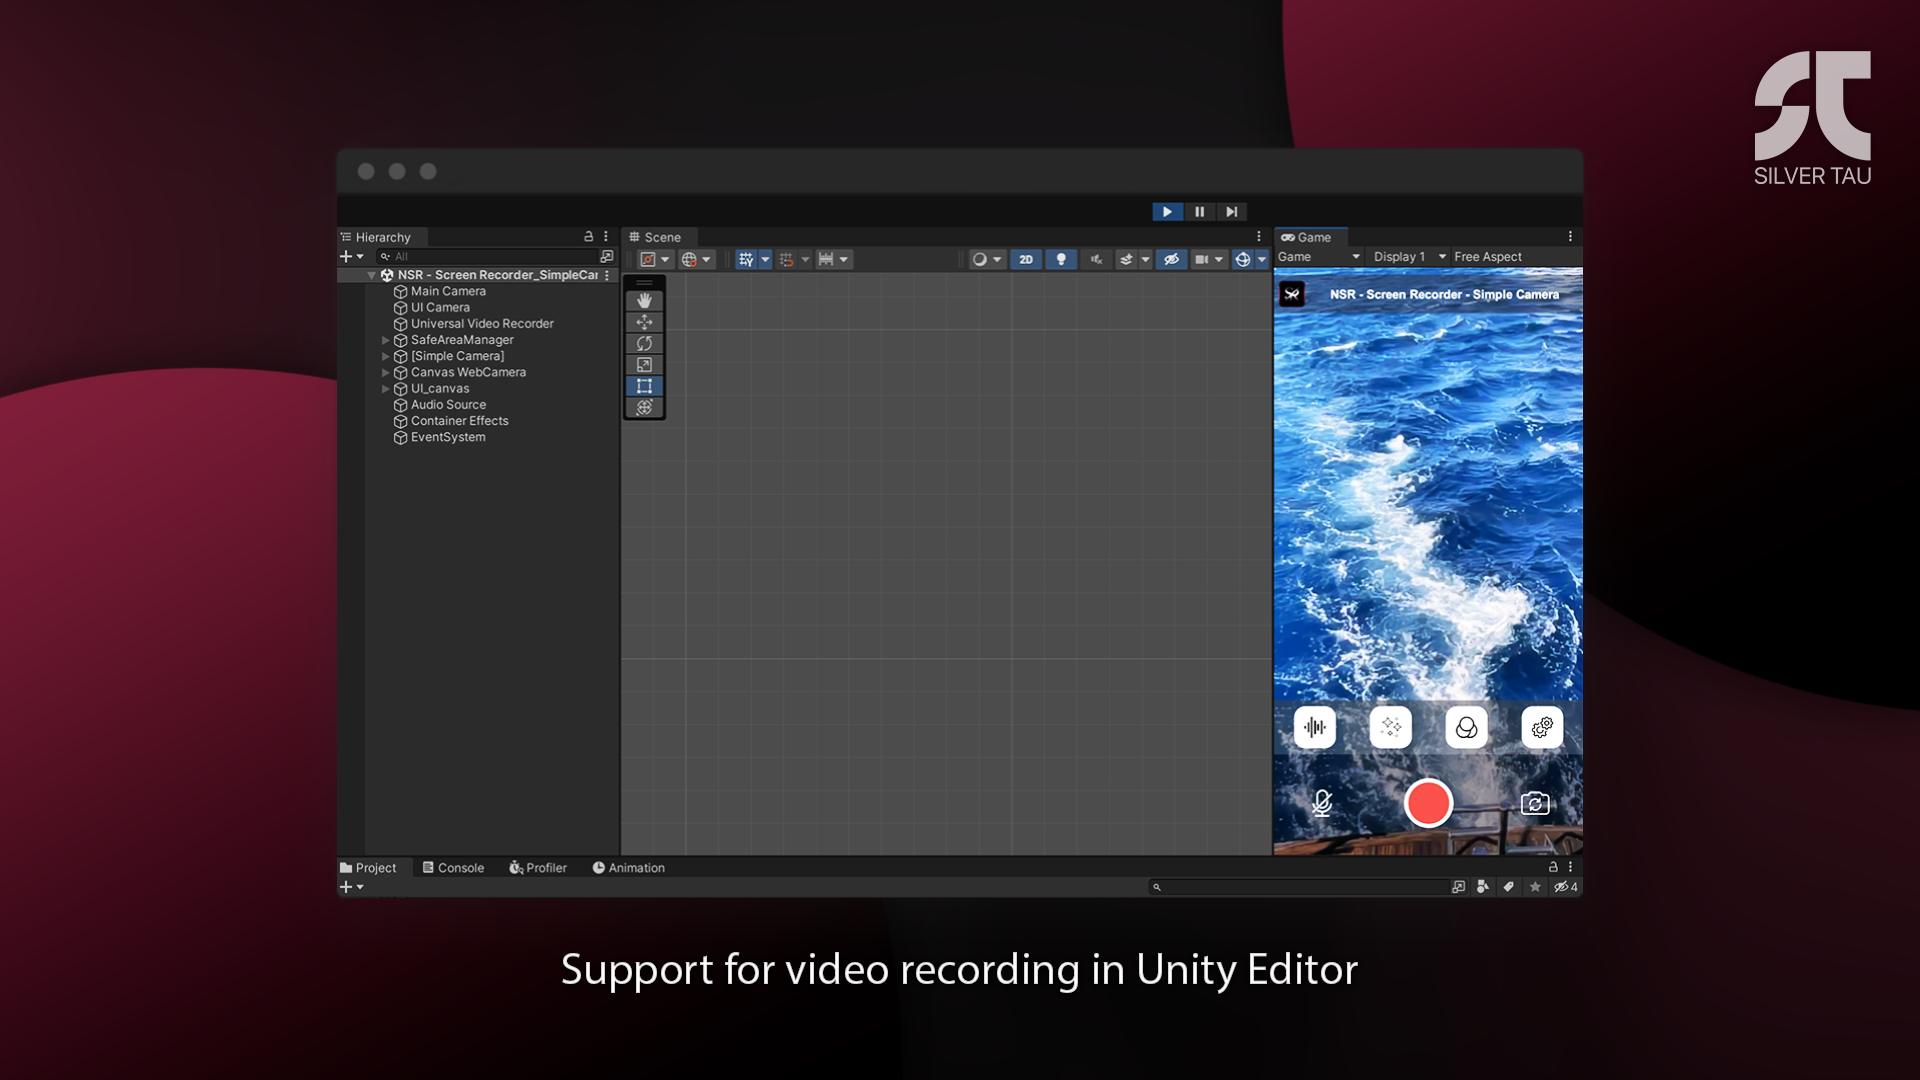
After adding the NSR - Screen Recorder to the scene, the hierarchy window will look like the one below.
This is the default scene setup, but you can rename or change the parentage of the GameObjects to suit your project's needs.
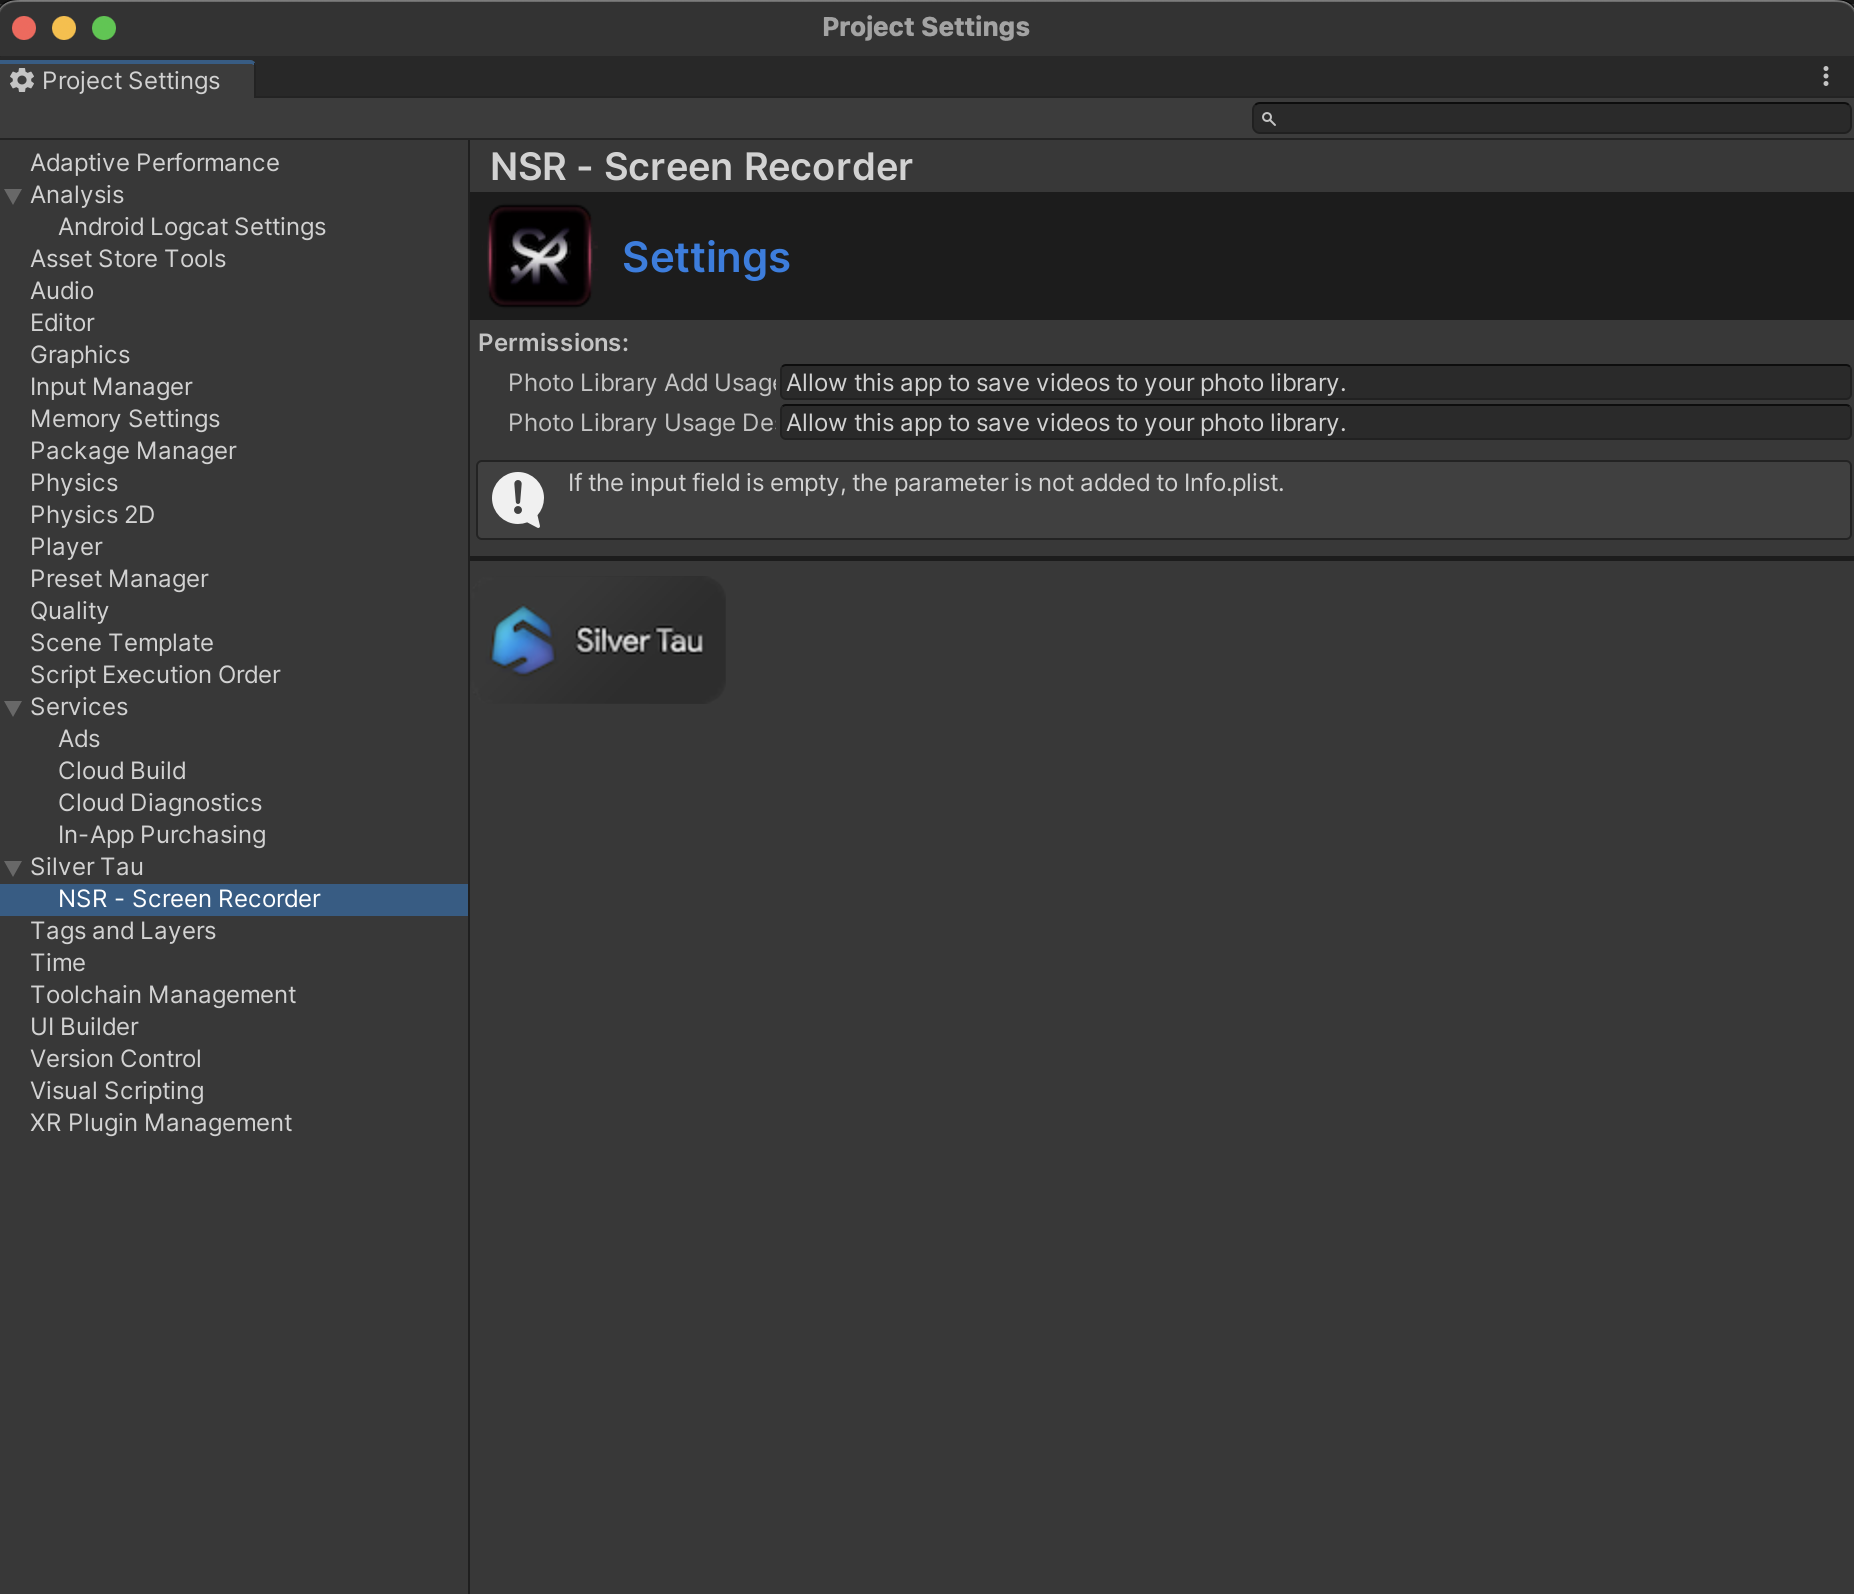
To save files on the iOS/iPadOS platform to Photos, you need special permissions. You can edit the description of the permissions or remove them (clear the input fields) as needed.
If you want to record screen content without UI content you need to (Build-in):
- UI Canvas should display content on top of the camera. To do this, set the Canvas settings in the renderer to mod - Screen Space - Overlay. This allows you not to add UI to the content that your main camera renders on the stage.
- Set the recording layers you need in the Universal Video Recorder script. For example, remove the UI layer.
The entire screen recording is ready for you to record the screen of the device without the content of UI components.
Starting with Unity 2019.4+, the engine has several Active Input Handling* options: Input Manager (Old), Input System Package (New), and Both.
If you are using Input Manager (Old) or Both, you do not need to make any changes to the example scenes provided in the package.
If you are using Input System Package (New), you need to add the Input System UI Input Module script to the EventSystem component on the Unity scene. This will ensure proper interaction with the UI for your project, according to the Unity Engine documentation.
Universal Render Pipeline
No special settings are required when using the Universal Render Pipeline. The whole process is automated.
If you see purple materials, this is a common issue in Unity when migrating a project to the Universal Render Pipeline (URP). By default, our plugin uses Standard shaders to ensure maximum compatibility across Unity projects. If you are using URP, these shaders can be easily updated automatically. This is the standard way of converting materials and switching to URP, and it is completely normal for Unity Engine projects.
Here are the standard way to make materials work with URP:
- In Unity, go to: Window → Rendering → Render Pipeline Converter
- Select Built-in to URP and check the options for Materials Upgrade, Shaders, and Prefabs.
- Click Initialize Converters → Convert Assets. This will re-map Standard shaders to URP-compatible shaders.
Note
If you plan to use the Universal Render Pipeline and the example scenes, don't forget to change the materials from the "Standard" shader to "Lit".
Post Processing Stack
The NSR - Screen Recorder plugin is fully compatible with the Post Processing Stack Unity Engine for any type of rendering.
If you use an extended range of colors, such as the Bloom effect or Emissive Materials, be sure to enable the "HDR" option for Universal Video Recorder (Cross-platform) or Graphic Provider (Cross-platform).
Note
HDR (high dynamic range) is used for a wide range of colors. Use this option when using HDR colors for materials or post-processing (e.g., Bloom effect, Emissive Materials, etc).
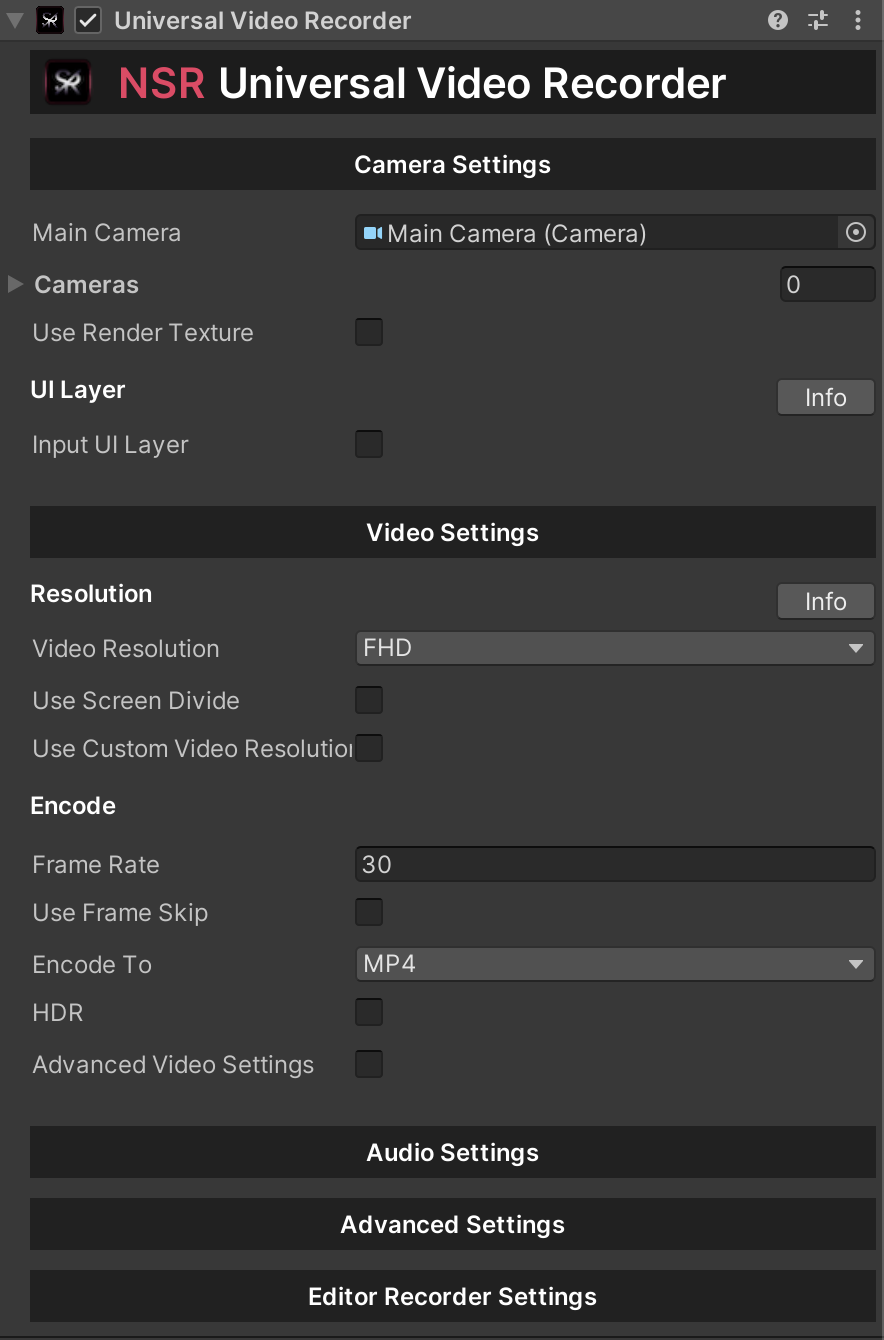
Universal Video Recorder (Cross-platform)
The main component that creates the connection between the Unity engine and the NSR framework (library).
This is a cross-platform script that provides the ability to record video (Android & iOS & macOS & Windows).
Actions
Use this to create some dynamic functionality in your scripts. Unity Actions allow you to dynamically call multiple functions.
| NSRVideoRecorder.onCompleteCapture |
Action that is called after a video is successfully created. |
| NSRVideoRecorder.onOutputVideoPathUpdated |
Action that is called after a video is successfully created and returns the updated output path of the video file. |
| NSRVideoRecorder.onFrameRender |
An action that is triggered every frame when recording a video. This frame is provided before it enters the video record, so it can be modified. |
Tip
If you notice a strong drop in frame rate while recording video on the target device, we recommend using the "frameSkip" parameter and setting it to 2.
Note
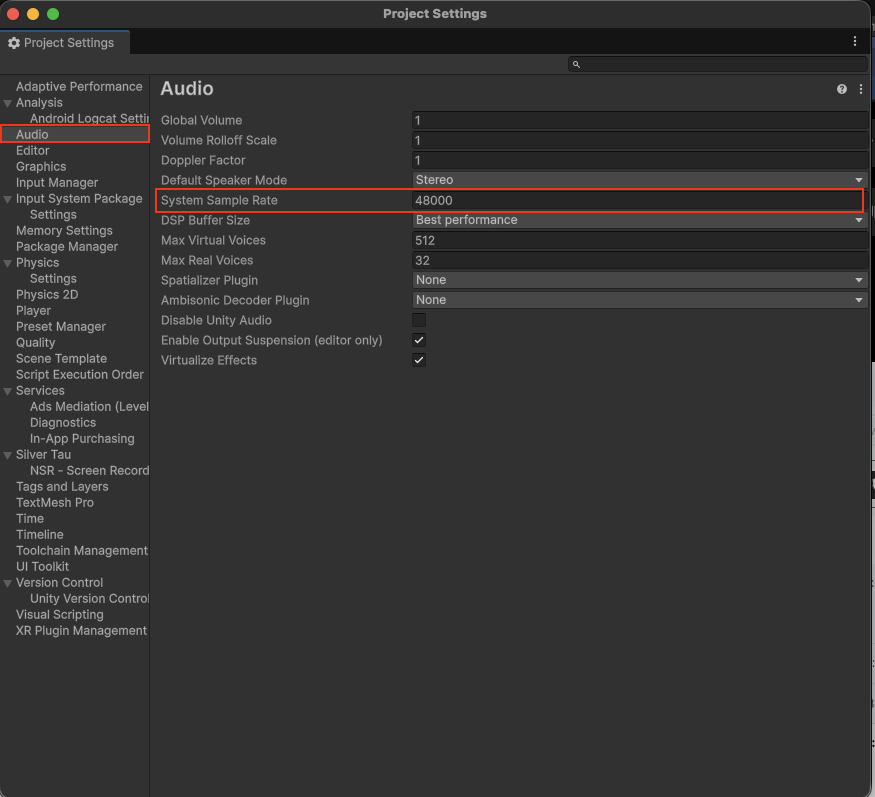
If you are using audio recordings, don't forget to configure the audio in your project:
Unity → Project Settings → Player → Audio → System Sample Rate → set to 48000 Hz
(or use the exact same value you're using in UniversalVideoRecorder settings)
You can use RenderTexture to record video. When you record video using this method, the video resolution and settings will depend on the render texture.
Tip
If the target recording camera has an active RenderTexture, video recording will automatically start using RenderTexture. This is done to automatically prevent video recording errors.
To record video using RenderTexture, you need to enable the "Use Render Texture" option and specify a render texture to be recorded in Universal Video Recorder.
Note
If you use the extended HDR color range to write to RenderTexture, remember to set the color format you need for rendering the texture, for example, R32G32B32A32_SFLOAT.
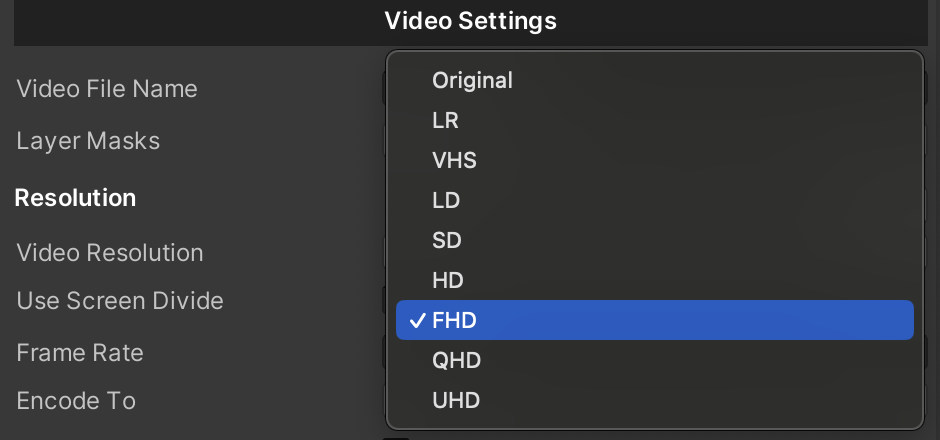
You can control the video resolution depending on the device's resolution using the Video Resolution enum.
Tip
If the video is portrait or landscape, the resolution will be calculated automatically.
| Original |
Device screen resolution |
| UHD |
2160p (3840 x 2160) |
| QHD |
1440p (2560 x 1440) |
| FHD |
1080p (1920 x 1080) |
| HD |
720p (1280 x 720) |
| SD |
480p (854 x 480) |
| LD |
360p (640 x 360) |
| VHS |
240p (426 x 240) |
| LR |
144p (256 x 144) |
Note
If you use RenderTexture, the video resolution will depend on the resolution of the RenderTexture.
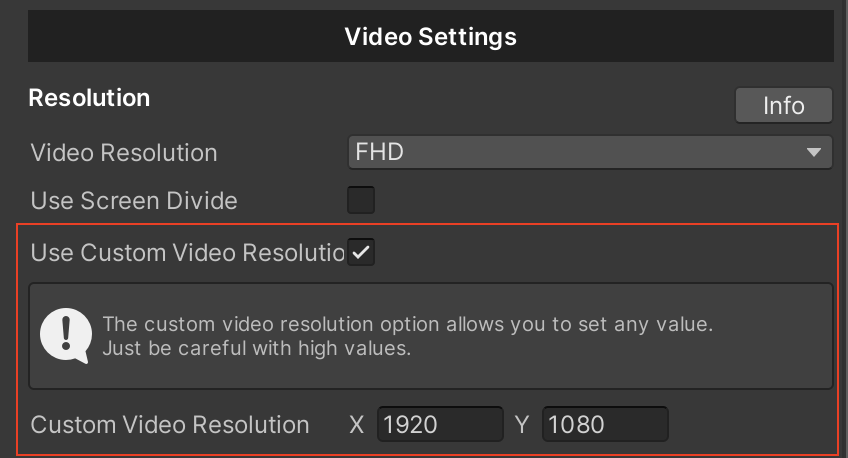
Starting with plugin version 1.7+, you can set custom values for video resolution.
Tip
When using a custom video resolution, the orientation of the device will not matter. You can shoot horizontal video in portrait mode or vice versa.
Below are recommendations for platform, codec, and format compatibility.
| Platform |
Video Format |
Video Codec |
Audio Codec |
| All Platforms |
MP4 Recommended |
H.264 / AVC |
AAC (LC) |
| Video Format |
Video Codec |
Audio Codec |
| MP4 Recommended |
H.264 (AVC), H.265 (HEVC), MPEG-4 SP |
AAC, AAC (LC), AAC (HE v1), AAC (HE v2), AAC (ELD), AAC (XHE) |
| WEBM |
VP8, VP9 |
Opus, Vorbis |
| 3GP |
H.263, H.264 (AVC) |
AAC, AAC (LC), AAC (HE v1), AAC (HE v2), AAC (ELD), AAC (XHE) |
| Video Format |
Video Codec |
Audio Codec |
| MP4 Recommended |
H.264, H.265 (HEVC), H.265 (HEVCWithAlpha), MPEG-4 Video, JPEG |
AAC, AAC (LD), AAC (ELD), AAC (ELD_SB), AAC (ELD_V2) |
| MOV |
H.264, H.265 (HEVC), H.265 (HEVCWithAlpha), Apple ProRes 4444, Apple ProRes 4444 XQ, Apple ProRes 422, Apple ProRes 422 HQ, Apple ProRes 422 LT, Apple ProRes 422 Proxy, JPEG, JPEGXL, MotionJPEG |
Linear PCM, AAC, AAC (LD), AAC (ELD), AAC (ELD_SB), AAC (ELD_V2), Apple Lossless |
| M4V |
H.264, H.265 (HEVC), H.265 (HEVCWithAlpha), MPEG-4 Video, JPEG |
AAC, AAC (LD), AAC (ELD), AAC (ELD_SB), AAC (ELD_V2) |
| 3GP |
H.264 (AVC) |
AAC, AAC (LD), AAC (ELD), AAC (ELD_SB), AAC (ELD_V2) |
| 3GPP |
H.264 (AVC) |
AAC, AAC (LD), AAC (ELD), AAC (ELD_SB), AAC (ELD_V2) |
| MPEG4 |
H.264, H.265 (HEVC), MPEG-4 Video |
AAC, AAC (LD), AAC (ELD), AAC (ELD_SB), AAC (ELD_V2) |
| Video Format |
Video Codec |
Audio Codec |
| MP4 Recommended |
H.264 (AVC), H.265 (HEVC) |
MPEG4AAC (AAC LC) |
| M4V |
H.264 (AVC), H.265 (HEVC) |
MPEG4AAC (AAC LC) |
Recommendation - *HEVC requires HEVC Video Extensions from Microsoft Store.
In graphics terminology, “alpha” is another way of saying “transparency”. Alpha is a continuous value, not something that can be switched on or off.
The lowest alpha value means an image is fully transparent (not visible at all), while the highest alpha value means it is fully opaque (the image is solid and cannot be seen through). Intermediate values make the image partially transparent, allowing you to see both the image and the background behind it simultaneously.
Tip
For best results, make the background of the camera a solid color, black is recommended.
The .webm file format has a specification refinement that allows it to carry alpha information natively when combined with the VP8 video codec. This means any Editor platform can read videos with transparency with this format.
Note
Alpha channel videos are supported for .webm and .mp4 formats.
If you want to record the screen content along with the UI content, the Canvas interface needs to display the camera content.
To do this, do the following:
- Enable the InputUILayer option.
- In the Canvas settings, set the rendering mode to Screen Space - Camera or World Space. This will allow you to add an interface to the content that your main camera is rendering on stage.
If you want to record the screen content without the UI content, remember that the Canvas interface needs to display the content on top of the camera.
To do this, do the following:
- Turn off the InputUILayer option.
- In the Canvas settings in the viewer, select View Mode - Screen Space - Overlay.
Note
If you plan to change the state of the UI layer in real time, use the UniversalVideoRecorder.ConfigInputUILayer parameter and change the Render Mode of the target canvas.
For an example, see the NSR - Screen Recorder_Record UI.
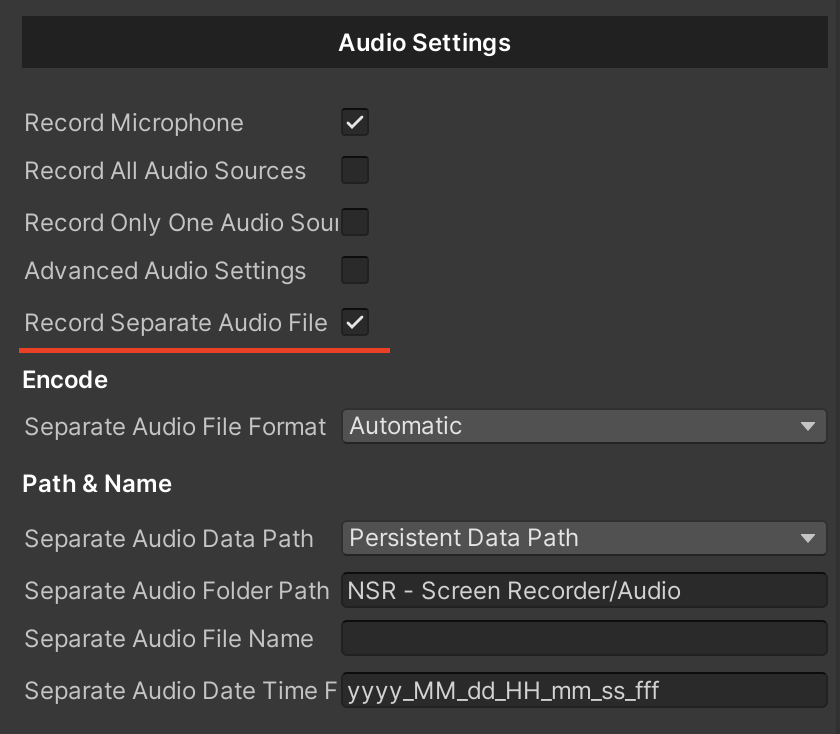
If you want to create a separate audio file when recording a video, you can use the "Separate audio file" function.
To do this, do the following:
- Enable the Record Separate Audio File option.
- Customize the path and name.
Saving the video and audio file is fully automated and has options for custom changes. Below are some examples of how a file is saved, its path, name, and how you can customize it.
Note
You can specify the path and name for the output files when you start recording video using the StartVideoRecorder(var path, var name, …) function.
Automatic saving
Automatic file saving is designed to avoid crashes when the file path and name are empty and to simplify the saving process.The default path for automatic saving is Application.persistentdatapath.
The name of the output file for automatic saving is formed as follows:
video + time + format.
Example: video_yyyy_MM_dd_HH_mm_ss_fff.mp4.
Custom saving
Custom file saving allows you to set any path or name for the output file.
settings.pathSettings = new PathSettings() {
    // Your path for video file (without file name)
    CustomOutputVideoFilePath = Path.Combine(Application.persistentDataPath, "video"),
    // Your file name (without format)
    CustomOutputVideoFileName = "output_video",
    // Your path for separate audio file (without file name)
    CustomOutputSeparateAudioFileName = Path.Combine(Application.persistentDataPath, "audio"),
    // Your file name (without format)
    CustomOutputSeparateAudioFilePath = "output_audio"
};
To change the output path of the video file, use the “CustomOutputVideoFilePath” option.
{
  private void Run()
  {
    UniversalVideoRecorder.NSRVideoRecorder.settings.pathSettings.CustomOutputVideoFilePath = Path.Combine(Application. persistentDataPath, "New folder");
    UniversalVideoRecorder.StartVideoRecorder();
  }
}
Note
If the output path is empty, an automatic path generation will be applied. (Application.persistentdatapath).
To change the name of the output video file, use the CustomOutputVideoFileName option.
{
  private void Run()
  {
    UniversalVideoRecorder.NSRVideoRecorder.settings.pathSettings.CustomOutputVideoFileName = "new name";
    UniversalVideoRecorder.StartVideoRecorder();
  }
}
Note
If the output file name remains the same, automatic name generation will be applied. (video + time + format)
In order to dynamically change cameras during video recording, you need to add the cameras you need to the “Cameras” list in Universal Video Recorder before starting video recording. After creating the list of cameras, the last camera that was turned on will be recorded. To switch cameras, you can simply turn the camera you need on or off.
Note
An example of using dynamic camera changes can be found in the NSR - Screen Recorder_Dynamic Camera Changes scene.
{
  private void StartRecording()
  {
    UniversalVideoRecorder.StartVideoRecorder();
  }

  private void StopRecording()
  {
    UniversalVideoRecorder.StopVideoRecorder();
  }
}
{
  private void PauseRecording()
  {
    UniversalVideoRecorder.PauseVideoRecorder();
  }

  private void ResumeRecording()
  {
    UniversalVideoRecorder.ResumeVideoRecorder();
  }
}
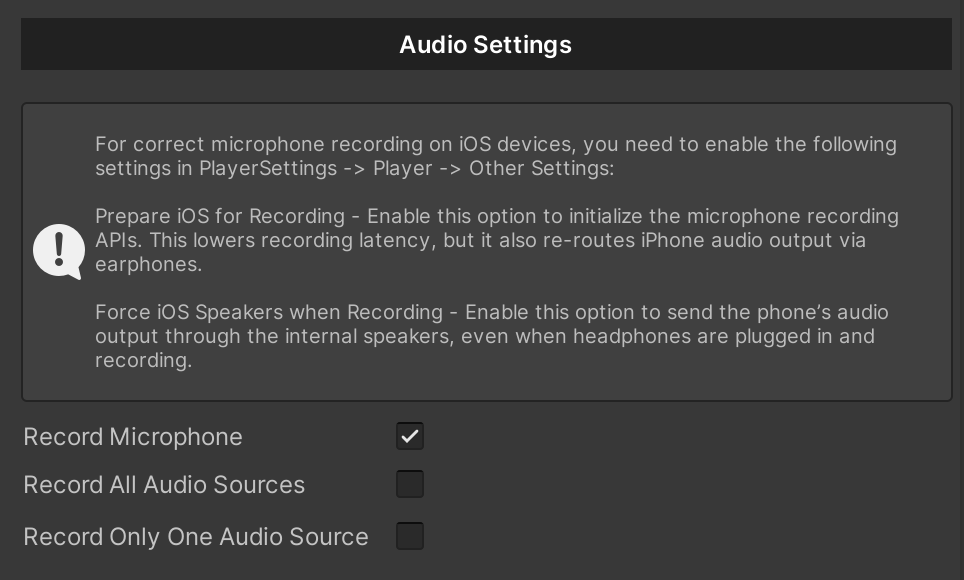
Recording sound from a microphone? A parameter that indicates whether the sound from the microphone will be recorded.
Note
For correct microphone recording on iOS devices, you need to enable the following settings in PlayerSettings -> Player -> Other Settings:
Prepare iOS for Recording - Enable this option to initialize the microphone recording APIs. This lowers recording latency, but it also re-routes iPhone audio output via earphones.
Force iOS Speakers when Recording - Enable this option to send the phone’s audio output through the internal speakers, even when headphones are plugged in and recording.
{
  private void RecordMicrophone()
  {
    UniversalVideoRecorder.recordMicrophone = true;
  }
}
Note
Remember, if you use microphone and audio source recording at the same time, you may get echo when recording the microphone.
To solve this, you can use headphones.
{
  private void RecordAllAudioSources()
  {
	//Set the Audio Listener.
	UniversalVideoRecorder.audioListener = audioListener;
	UniversalVideoRecorder.recordAllAudioSources = true;
  }
}
{
  private void RecordMicrophone()
  {
	//Set the Audio Source.
	UniversalVideoRecorder.targetAudioSource = targetAudioSource;
	UniversalVideoRecorder.recordOnlyOneAudioSource = true;
  }
}
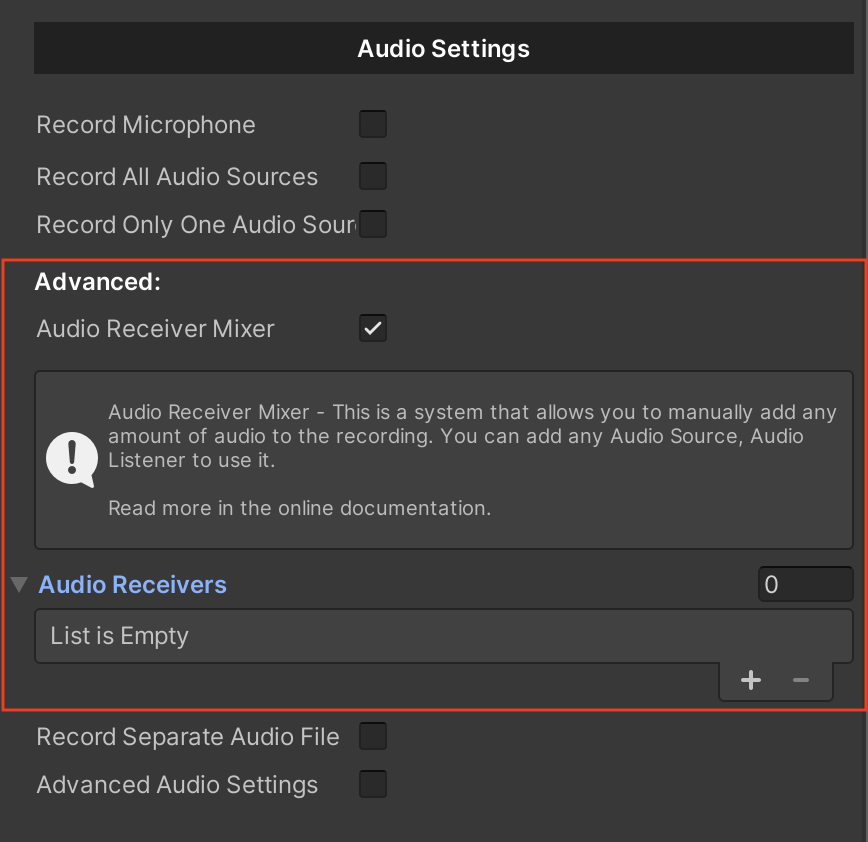
This is a system that allows you to manually add any amount of audio to the recording. You can add any Audio Source, Audio Listener to use it.
Note
If you are using Audio Receiver Mixer, the basic options Record Microphone, Record All Audio Sources and Record Only One Audio Source will be ignored. You can disable them. You need to add Audio Receiver to your audio source and add it to the list.
Example of use:
For example, we will create a system for recording an audio scene and a custom microphone using new features. Below, we will describe the steps and additional instructions for them.
1. Let's enable the functionality to use the Audio Receiver Mixer.
To do this, go to the Universal Video Recorder -> Audio Settings -> enable the “Audio Receiver Mixer” option.
2. Now we can add any AudioSource to the scene.
We plan to record Audio Listener, so it will be responsible for all audio sources in our scene. Go to or add an Audio Listener component to your scene and add an “Audio Receiver” to it.
3. Now let's create a microphone.
It will have the functionality of turning on when you start recording video and turning off when you finish.
using SilverTau.NSR.Recorders.Video;
using UnityEngine;
using UnityEngine.Audio;

namespace SilverTau.NSR.Samples
{
    public class MicrophoneMixerInput : MonoBehaviour
    {
        // AudioSource to handle microphone input
        private AudioSource _micSource;

        private void Start()
        {
            // Initialize the AudioSource
            _micSource = gameObject.GetComponent<AudioSource>();
            _micSource.mute = true;

            UniversalVideoRecorder.Instance.NSRVideoRecorder.onStartCapture += OnStartCapture;
            UniversalVideoRecorder.Instance.NSRVideoRecorder.onStopCapture += OnStopCapture;
        }

        private void OnStopCapture()
        {
            Microphone.End(null);
            _micSource.mute = true;
        }

        private void OnStartCapture()
        {
            Run();
        }

        // Captures the microphone input, initializes the AudioSource, and starts playback.
        private void Run()
        {
            _micSource.clip = Microphone.Start(null, true, 10, 44100); // or 48000
            _micSource.loop = true; // Enable looping for continuous audio playback

            // Wait for the microphone to initialize before playing
            while (!(Microphone.GetPosition(null) > 0)) {}
            _micSource.Play(); // Play the microphone audio
            _micSource.mute = false;
        }
    }
}
4. Now we need to add Audio Source and Audio Receiver to the new component on the scene with the microphone.
5. After that, we need to go to the newly created Audio Receiver and enable the “IsMute” option.
This feature will mute the audio on the stage but still record it to the audio track. When enabled, the audio buffer will be cleared, resulting in silence on the scene.
6. Now we need to add Audio Receiver components to the list of settings in Universal Video Recorder.
Great! Now you're ready to record with your custom components and audio settings.
{
  private async void CurrentVideoOutputPath()
  {
    var path = await UniversalVideoRecorder.NSRVideoRecorder.GetVideoOutputPath();
  }
}
{
  private void GetVideoOutputPath()
  {
	var path = UniversalVideoRecorder.NSRVideoRecorder.VideoOutputPath;
  }
}
Screen Recorder (iOS/iPadOS)
The main component that creates the connection between the Unity engine and the NSR plugin. (Only iOS)
This is a script that allows you to record video using RPScreenRecorder and only for the iOS/iPadOS platform.
Actions
Use this to create some dynamic functionality in your scripts. Unity Actions allow you to dynamically call multiple functions.
| recorderStart |
An action that signals the start of screen recording. |
| recorderStop |
An action that signals when the screen recording stops. |
| recorderShare |
An action that signals that you have shared a recording. |
| recorderError |
An action that signals an error when recording a screen. |
| recorderShareError |
An action that signals an error when you share a recording. |
| onRecorderStatus |
An action that is called when the screen recording status changes. |
Examples of use:
Initialize/Dispose framework:
{
  //A method that initializes the framework.
  private void Init()
  {
    ScreenRecorder.Initialize();
  }

  //A method that disposes the framework.
  private void Dispose()
  {
    ScreenRecorder.Dispose();
  }
}
Start/Stop video recording:
{
  //A method that starts recording the screen.
  private void StartRecording()
  {
    ScreenRecorder.StartScreenRecorder();
  }

  //A method that stops recording the screen.
  private void StopRecording()
  {
    ScreenRecorder.StopScreenRecorder();
  }
}
Share:
{
  //A method that allows you to share.
  //"path" > Path to video. If the value is null, the value of the last recorded video is taken.
  private void Share(string path)
  {
    if (string.IsNullOrEmpty(path)) return;
    ScreenRecorder.Share(path);
  }
}
Save video to Photos:
{
  //A method that allows you to save video file to Photos Album.
  //"path" > Path to video. If the value is null, the value of the last recorded video is taken.
  private void SaveVideoToPhotos(string path)
  {
    if (string.IsNullOrEmpty(path)) return;
    ScreenRecorder.SaveVideoToPhotosAlbum(path);
  }
}
Update settings:
{
  //A method that helps you update the settings for recording live video.
  //"microphone" > Microphone status.
  //"popoverPresentation" > State of the popover presentation.
  //"saveVideoToPhotosAfterRecord" > Save video to a photo after recording?
  private void UpdateSettings(bool microphone, bool popoverPresentation, bool saveVideoToPhotosAfterRecord)
  {
    ScreenRecorder.UpdateSettings(microphone, popoverPresentation, saveVideoToPhotosAfterRecord);
  }
}
Graphic Provider (Cross-platform)
The main system that manages subsystems, parameters, and the way images are created and saved. The root system is the main and unifying one for all subsystems.
Scenes:
| NSR - Screen Recorder_Graphic |
An example of a scene that demonstrates how the plugin works with Graphic Provider and the basic settings. |
Examples of use:
Create a Shared Graphic:
{
  [SerializeField] private GraphicProvider graphicProvider;

  private void CreateImage()
  {
    graphicProvider.CreateImage();
  }
}
Get a Shared Graphic:
{
  [SerializeField] private GraphicProvider graphicProvider;

  private void GetImage()
  {
    var sharedGraphic = graphicProvider.GraphicSubsystems.First().sharedGraphic;
  }
}
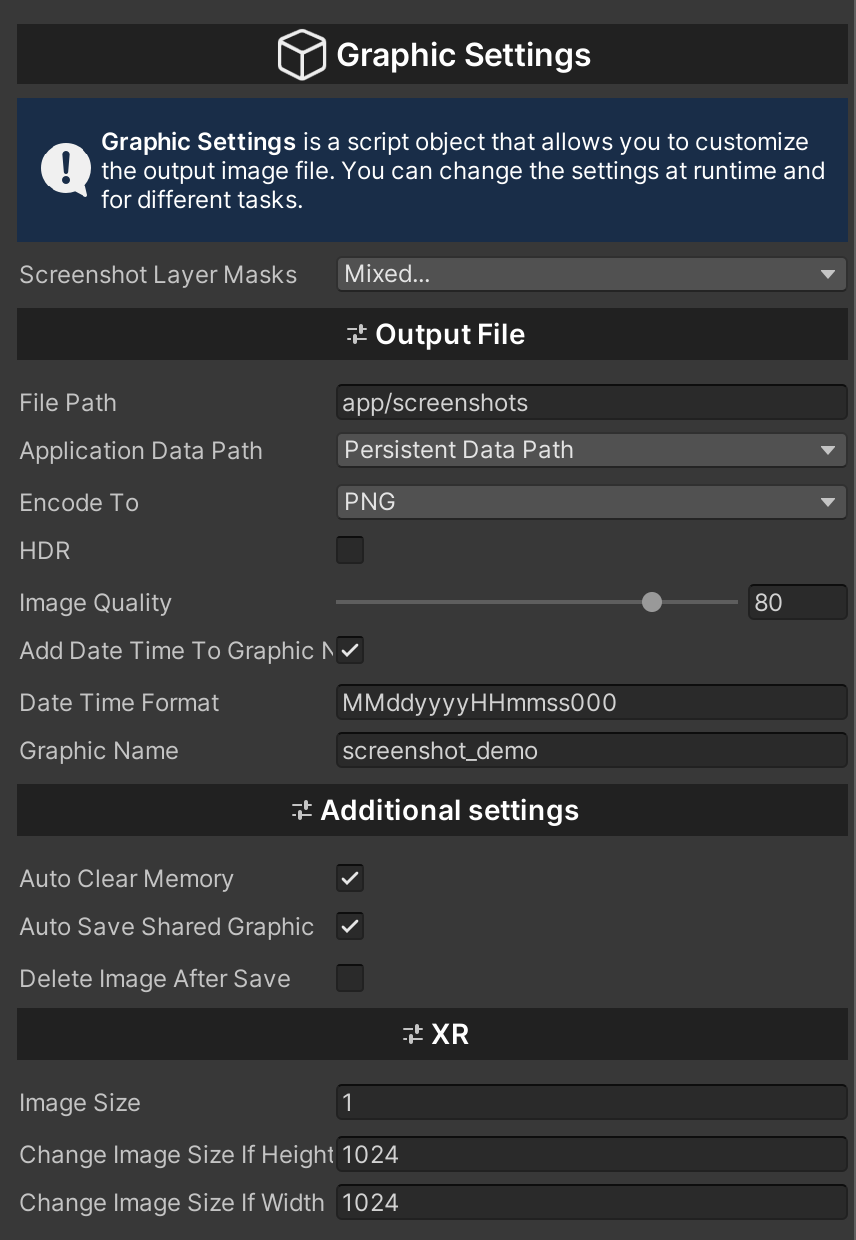
| screenshotLayerMasks |
Layers that will be displayed when you take a screenshot. |
| filePath |
The part of the original path that will be used to save the image. |
| applicationDataPath |
The main path where the images will be stored. |
| encodeTo |
Image encoding format. |
| HDR |
HDR (high dynamic range) is used for a wide range of colors. Use this option when using HDR colors for materials or post-processing (e.g., Bloom effect). |
| imageQuality |
Graphic image quality. Only for .jpg format. |
| addDateTimeToGraphicName |
A parameter that allows you to use your own time format for a screenshot. |
| dateTimeFormat |
Custom time format for screenshots. |
| graphicName |
A parameter that gives a custom name to the image. |
| autoClearMemory |
A parameter that allows you to automatically clear the memory after the subsystem creates an image. |
| autoSaveSharedGraphic |
A parameter that allows you to automatically save images after they are created by the subsystem. |
| deleteImageAfterSave |
A parameter that allows you to automatically delete images after the subsystem creates an image. |
| imageSize |
Sets the divider for the output image from the XR camera. 1 is the default value, which represents the original image size. |
| changeImageSizeIf WidthMore |
Check the maximum output size of the image by width. If the image is larger than this check, the output image divider "imageSize" will be used. |
| changeImageSizeIfHeightMore |
Parameter to check the maximum output image size in height. If the image is larger than this check, the output image divider "imageSize" will be used. |
Get a output path for shared graphics:
public class CustomScript : MonoBehaviour {
  private void GraphicProcess(GraphicProvider graphicProvider) {
    if(graphicProvider.GraphicSubsystems == null) return;

    var graphicSubsystem = graphicProvider.GraphicSubsystems.First();

    if (graphicSubsystem == null) {
        Debug.Log("Graphic subsystem is missing.");
        return;
    }

    var sharedGraphic = graphicSubsystem.sharedGraphic;

    if (sharedGraphic == null) {
        Debug.Log("Shared Graphic is missing.");
        return;
    }

    graphicSubsystem.OnSharedGraphicSaved = path =>
    {
        // Output file path => path
        WriteGraphicInfo(sharedGraphic);
    };
  }

  private void WriteGraphicInfo(SharedGraphic sharedGraphic) {
    Debug.Log(string.Format("Shared Graphic: {0}", sharedGraphic.id));
    Debug.Log(string.Format("Name: {0}", sharedGraphic.name));
    Debug.Log(string.Format("Output path: {0}", sharedGraphic.outputPath));
  }
}
Graphic Settings
It is a script object that sets the general settings of the system. Settings can be changed both at runtime and in the Unity Editor. Also, the settings script can be changed at any time you need it.
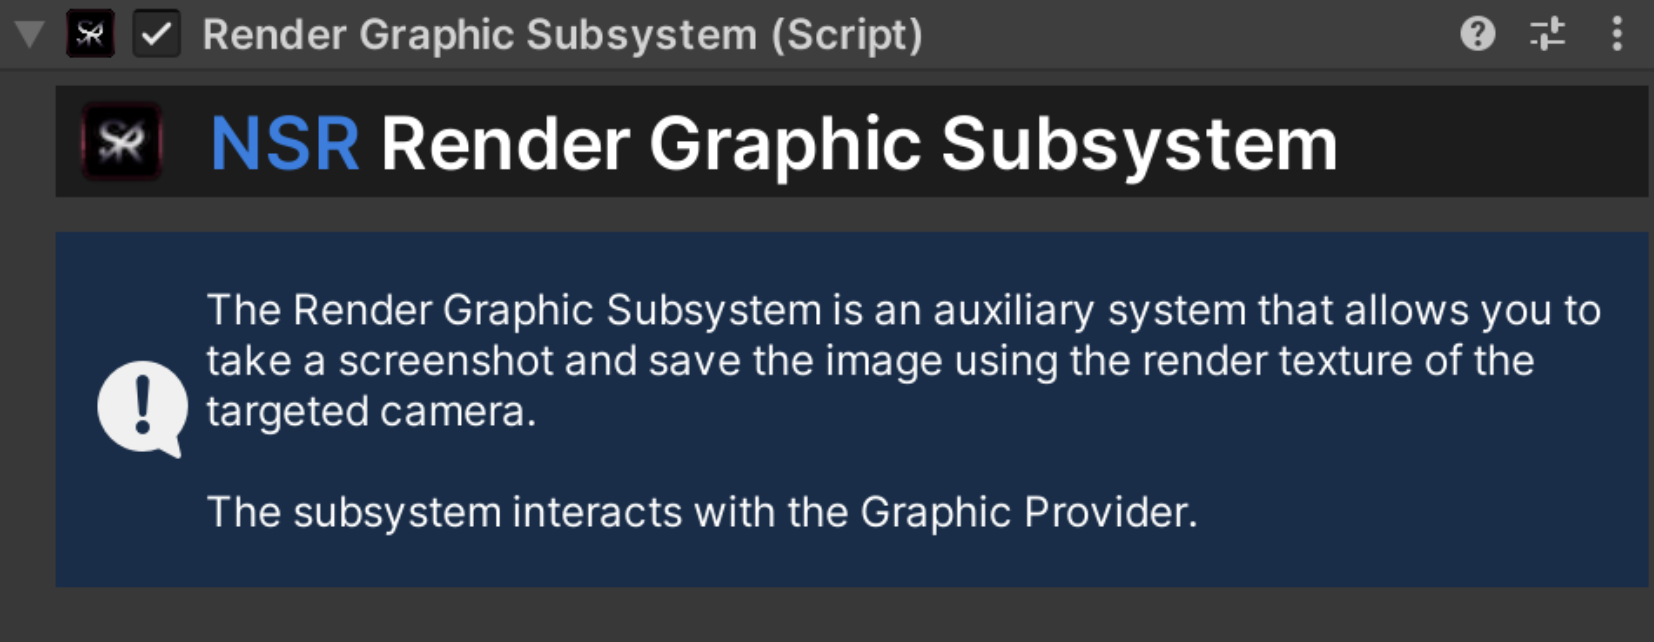
Graphic Subsystem
An abstract class that is the basis for creating a subsystem that provides the original image. With this class, you can create your own subsystems or modify existing subsystems to meet your needs.
Microphone Audio Recorder (Cross-platform)
A component that creates a connection between the Unity Engine and audio recording plugins and provides the ability to create audio files (Android & iOS & macOS & Windows).
This is a module that allows you to record audio and create an audio output file.
Actions
Use this to create some dynamic functionality in your scripts. Unity Actions allow you to dynamically call multiple functions.
| onCompleteCapture |
An event indicating that the recording is complete. |
| onErrorCapture |
An event that indicates that an error has occurred. |
| sampleBufferDelegate |
An event that allows you to get the current sample buffer. |
Properties
Description of the main parameters and options that will help you manage the module.
| audioFormats |
The format of the output audio file. |
| HeaderSize |
The header size for the audio file. Be careful when changing it. The default value is 44. |
| setAutoFrequency |
Automatic frequency detection. |
| frequency |
Frequency for the audio file. Be careful when changing it. The default value is 48000. |
| setAutoChannels |
Automatic detection of the number of channels. |
| channels |
The number of channels for the audio file. Be careful when changing it. The default value is 2. |
| computeRMS |
Enable/disable RMS value calculation. |
| computeDB |
Enable/disable Decibel value calculation. |
| bufferWindowLength |
The size of the buffer window for calculating RMS and Decibels. |
| CurrentRMS |
Current RMS value. |
| CurrentDB |
Current Decibel value. |
| CurrentAudioInputComponent |
The current recording settings of the AudioInputComponent. |
| GetAudioSource |
Audio Source to store Microphone Input, An AudioSource Component is required by default |
Examples of use:
Start/Stop audio recording:
{
  [SerializeField] private MicrophoneAudioRecorder microphoneAudioRecorder;

  private string _currentMicrophoneDevice;
  private bool _isRecording;

  // The function that starts recording audio.
  private void StartRecording()
  {
    // Get a list of available microphone devices.
    var microphoneDevices = microphoneAudioRecorder.GetMicrophoneDevices();

    // For recording, we'll use the first microphone in the list.
    _currentMicrophoneDevice = _microphoneDevices.Length > 0 ? _microphoneDevices[0] : null;

    // Start the audio recording process.
    microphoneAudioRecorder.StartRecording(_currentMicrophoneDevice);
    _isRecording = true;
  }

  // The function that stops recording audio.
  private void StopRecording()
  {
    if (!_isRecording) { return; }

    // Create and verify the output path for the audio file.
    var audioFilePath = Path.Combine(Application.persistentDataPath, "NSR - Screen Recorder", "Audio");

    if (!Directory.Exists(audioFilePath))
    {
        Directory.CreateDirectory(audioFilePath);
    }

    // Create a name for the audio file (you don't need to enter a file extension).
    var audioFileName = DateTime.UtcNow.ToString("yyyy_MM_dd_HH_mm_ss_fff");

    // Stop the process of creating an audio file.
    // The output audio file will be automatically saved to your path.
    microphoneAudioRecorder.StopRecording(audioFilePath, audioFileName);
    _isRecording = false;
  }
}
Device permissions
Starting with the 1.6.0 version of the plugin, the function of limiting the camera and microphone usage permissions has been added. Now you can use the plugin without requiring permission to use the microphone and camera, for example, if you only want to record video.
In order to remove the forced permissions for your application, you need to add the symbols you need to Scripting Define Symbols in Player Settings -> Other Settings.
Note
Scripting Define Symbols:
NSR_MICROPHONE_DISABLE - allows you to completely disable the device's microphone (for the plugin).
NSR_CAMERA_DISABLE - allows you to completely disable the device's camera (for the plugin).
Watermark
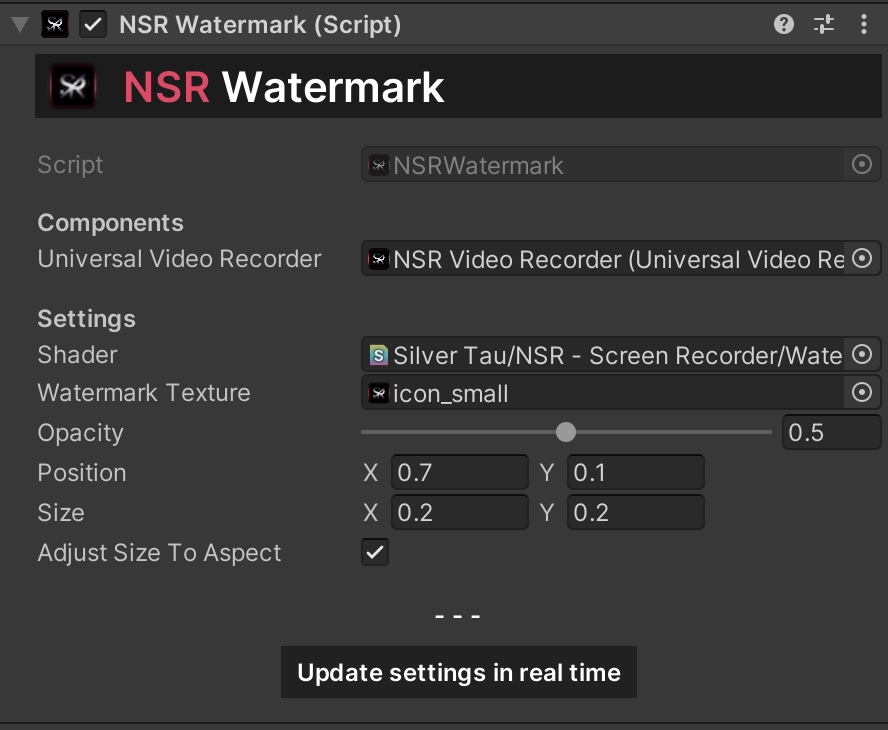
Starting with the 1.7.2 version of the plugin, the ability to process frames before sending them to the recorder has been added. The NSR - Watermark component is responsible for applying a watermark to each frame of the video recorded with UniversalVideoRecorder.
This component allows you to customize the appearance of the watermark using a shader, texture, size, position, and transparency. It also supports automatic scaling of the watermark to fit the aspect ratio of the texture.
To add a basic module to a scene, you need to do the following:
- In the scene hierarchy, add a component from the quick menu (or manually).
- In the Component inspector, add the basic elements.
Note
If you encounter black frames when recording video on Android, please check your Graphics API. We recommend setting the Auto Graphics API option.
1. Initialization:
- When the component is enabled (OnEnable), it creates an instance of WatermarkRenderer with the provided shader and parameters.
- It subscribes to the onFrameRender event of the UniversalVideoRecorder.
2. Watermark Rendering:
- On every video frame, OnFrameRender is triggered, applying the watermark texture on top of the video frame.
- If adjustSizeToAspect is enabled, the watermark size is automatically adjusted to preserve the texture's aspect ratio (only done on the first frame).
3. Live Updates:
You can update the watermark’s appearance at runtime using the following methods:
- ChangePosition(Vector2) – updates position (normalized)
- ChangeSize(Vector2) – updates size (normalized)
- ChangeOpacity(float) – updates transparency (0–1)
- ChangeWatermarkTexture(Texture) – changes the texture
- ChangeShader(Shader) – applies a new shader
- UpdateSettingsRealtime() – re-applies all current settings
4. Cleanup:
- When the component is disabled (OnDisable), it unsubscribes from the render event and disposes of the watermark renderer.
Custom Frame Processors
The NSR - Watermark component demonstrates how to inject custom logic into the video rendering pipeline using the UniversalVideoRecorder.onFrameRender event.
This opens the door to building your own custom frame processors - for adding filters, effects, overlays, analysis, or any real-time modification to the captured video frames.
To implement your own custom frame logic:
- Subscribe to the onFrameRender event of the UniversalVideoRecorder.
- Process the frame texture however you need (e.g., apply a shader, copy to another texture, analyze pixel data, etc.).
- Optionally render your result back to the frame or save it elsewhere.
Below is a simple example of a component that applies a custom grayscale shader to each video frame:
using UnityEngine;
using SilverTau.NSR.Recorders.Video;

public class CustomGrayscaleFrameProcessor : MonoBehaviour
{
    [SerializeField] private UniversalVideoRecorder recorder;
    [SerializeField] private Shader grayscaleShader;

    private Material _material;

    private void OnEnable()
    {
        if (recorder == null || grayscaleShader == null) return;

        _material = new Material(grayscaleShader);
        recorder.NSRVideoRecorder.onFrameRender += OnFrameRender;
    }

    private void OnDisable()
    {
        if (recorder == null) return;

        recorder.NSRVideoRecorder.onFrameRender -= OnFrameRender;
        Destroy(_material);
    }

    private void OnFrameRender(Texture frame)
    {
        RenderTexture temp = RenderTexture.GetTemporary(frame.width, frame.height);
        Graphics.Blit(frame, temp, _material); // Apply grayscale shader
        Graphics.Blit(temp, frame);            // Overwrite original frame
        RenderTexture.ReleaseTemporary(temp);
    }
}
Use Cases for Custom Frame Logic
- Apply visual effects (grayscale, blur, sepia, distortion)
- Add dynamic overlays (text, UI, data feeds)
- Perform real-time computer vision or image analysis
- Stream frames to an external server
Tip
Make sure your custom frame logic is efficient. It runs every frame and can easily bottleneck performance or cause dropped frames if:
- You allocate too many temporary textures
- Your shader is complex
- You perform CPU-GPU readbacks
Use RenderTexture.GetTemporary() and Graphics.Blit() wisely, and dispose of everything when done.
Share
Your app can share any files and folders. Share utility is a simple way to share content from one app to another, even from different developers.
Functions:
| ShareItem |
A function that allows you to share an item. |
public class CustomShare : MonoBehaviour
{
  // A function that allows you to share a file & folder & image & video and e.t.c.
  public void ShareFile(string path)
  {
    Share.ShareItem(path);
  }
}
public class CustomShare : MonoBehaviour
{
  public void ShareTexture(Texture2D texture) {
    if (texture == null) return;

    texture.Share(TextureEncodeTo.PNG);

    // or

    if (ShareExtension.TryShareItem(texture, TextureEncodeTo.PNG)) {
      Debug.Log("Done!");
    }
  }
}
public class CustomShare : MonoBehaviour
{
  public void ShareBytes(byte[] data) {
    if(data == null) return;

    data.Share(".fileFormat");

    // or

    if (ShareExtension.TryShareItem(data, ".fileFormat")) {
      Debug.Log("Done!");
    }
  }
}
Gallery
Your app can save any videos and pictures to your device's gallery. The Gallery utility is a simple and convenient way to save content to your target device.
Functions:
| SaveVideoToGallery |
A method that allows you to save a video file to Gallery (Photos Album). |
| SaveImageToGallery |
A method that allows you to save an image file to Gallery (Photos Album). |
public class CustomGallery : MonoBehaviour
{
  // A method that allows you to save a video file to Gallery (Photos Album).
  public void SaveVideoFile(string path, string androidFolderPath = "NSR_Video")
  {
    Gallery.SaveVideoToGallery(path, androidFolderPath);
  }

  // A method that allows you to save an image file to Gallery (Photos Album).
  public void SaveImageFile(string path, string androidFolderPath = "NSR_Video")
  {
    Gallery.SaveImageToGallery(path, androidFolderPath);
  }
}
public class CustomShare : MonoBehaviour
{
  public void SaveToGalleryTexture(Texture2D texture, string androidFolderPath = "NSR_Video")
  {
    if(texture == null) return;

    texture.SaveImageToGallery(TextureEncodeTo.PNG, androidFolderPath);

    // or

    if (GalleryExtension.TrySaveImageToGallery(texture, TextureEncodeTo.PNG, androidFolderPath))
    {
       Debug.Log("Done!");
    }
  }
}
public class CustomShare : MonoBehaviour
{
  public void SaveToGalleryBytes(byte[] data, string androidFolderPath = "NSR_Video")
  {
    if(data == null) return;

    data.SaveVideoToGallery(".mp4", androidFolderPath);

    // or

    if (GalleryExtension.TrySaveVideoToGallery(data, ".mp4", androidFolderPath))
    {
       Debug.Log("Done!");
    }
  }
}
File Manager
An abstract class that is the basis for creating a subsystem that provides the original image. With this class, you can create your own subsystems or modify existing subsystems to meet your needs.
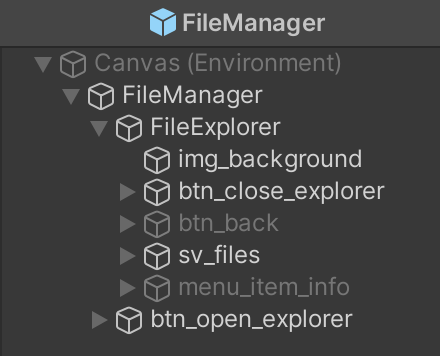
A file manager is a prefab that provides a user interface for managing files and folders. The most common operations performed on files or groups of files include opening (e.g., viewing, playing), deleting, and searching for files. Folders and files can be displayed in a hierarchical tree based on their directory structure.
Properties:
| storageType |
The target storage type determines the location from which files will be parsed. |
| customStorageType |
Custom path for file analysis and storage type. The parameter will be effective if the Storage type is set to Custom. |
| fileExplorer |
File Explorer is a script that performs file recognition and search functions for the selected storage type. |
What's new
Version [2.0.4]
Updated
- Universal Video Recorder;
- NSR Libraries;
- NSR Frameworks;
- Documentation;
Fixed
Upgrade guide (v2.0.0)
This guide explains what changed in 2.0.0, how to migrate from 1.x, and how to use the new configuration flow (including per-platform ScriptableObjects for recorder settings, video/audio codecs, and output formats).
What’s new
- Refactored runtime core behind UniversalVideoRecorder most low-level functionality moved into an internal NSRVideoRecorder engine (composition over inheritance). Public entry points remain (start/stop/pause/resume), but wiring is new.
- Event surface moved: recorder events like onCompleteCapture, onFrameRender and others are now exposed through UniversalVideoRecorder.NSRVideoRecorder (nested engine), not directly on UniversalVideoRecorder. Samples & watermark now subscribe to nested events.
- Platform settings via SO assets: set per-platform recorder settings (Android/iOS/macOS/Windows), codecs and formats via ScriptableObjects and a single setup call.
- New resolution pipeline: a compact ResolutionSettings block + unified SetVideoResolution(...).
- Safer preview image path that locates an active camera from the configured list before capturing (instead of assuming a specific camera).
- Watermark flow updated to attach on the new frame event surface and guard against missing engine instance; optional safe GPU blit kept.
- Cameras (UniversalVideoRecorder): the Main Camera parameter has been removed and replaced with the Cameras array.
Note
Editor-only recording code and editor-specific fields previously embedded into UniversalVideoRecorder have been removed from the public class in favor of a cleaner runtime surface.
1. Migration (1.x → 2.0.0)
Starting with version 2.0.0, all events are executed from the core class NSR_VideoRecorder. This simplifies basic event calls and allows for custom use of the NSR_VideoRecorder class and custom implementations.
| Example of change |
universalVideoRecorder.onCompleteCapture += ... |
universalVideoRecorder.NSRVideoRecorder.onCompleteCapture += ... |
| Cameras |
universalVideoRecorder.mainCamera = ... or universalVideoRecorder.cameras = ... |
var settings = universalVideoRecorder.NSRVideoRecorder.settings;
settings.cameras = new []; |
| Custom Microphone source |
universalVideoRecorder.MicrophoneSource = .... |
universalVideoRecorder.NSRVideoRecorder.MicrophoneSource = ... |
Note
Ready-to-use examples are in the updated sample scripts (VideoPreviewHandheld, VideoPreviewPlayer).
1.2 Editor-only fields removed from public class
The legacy editor encoder/profile/alpha toggles and NSREditorCorder wiring that lived inside UniversalVideoRecorder were removed. The entire process is now automated.
1.3 Watermark hook
Watermark now checks for NSRVideoRecorder presence and subscribes to NSRVideoRecorder.onFrameRender. Update your hookup if you used custom scripts.
2. New features and configuration
2.1 Centralized setup with per-platform ScriptableObjects
Call once before recording:
NSRVideoRecorder.SetPlatformRecorderSettings(androidRecorderSettings, iOSRecorderSettings, macOSRecorderSettings, windowsRecorderSettings);
NSRVideoRecorder.SetupRecorder();
Note
If ScriptableObjects are not set, standard settings will be used for video recording (MP4, H.264, AVC, AAC).
This wires platform-specific ScriptableObject assets (your codec/container presets) into the engine. Reference via inspector fields.
Typical SO content (recommended fields):
- Video format (container) (MP4/MOV/WebM and others — platform availability varies)
- Video codec (e.g., H.264/AVC, HEVC/H.265, VP8/9, and others - platform availability varies)
- Audio codec (AAC/Opus/PCM, and others - platform availability varies)
Note
In 2.0.0, you pass these SOs to the engine in one place — no more scattering per-platform branches throughout the code.
2.2 Resolution
Provide all resolution-related inputs in one place:
settings.resolutionSettings = new ResolutionSettings {
    videoResolution = videoResolution,
    useCustomVideoResolution = useCustomVideoResolution,
    customVideoResolution = customVideoResolution
};
2.3 Path
Provide all path inputs in one place:
settings.pathSettings = new PathSettings() {
    // Your path for video file (without file name)
    CustomOutputVideoFilePath = Path.Combine(Application.persistentDataPath, "video"),
    // Your file name (without format)
    CustomOutputVideoFileName = "output_video",
    // Your path for separate audio file (without file name)
    CustomOutputSeparateAudioFileName = Path.Combine(Application.persistentDataPath, "audio"),
    // Your file name (without format)
    CustomOutputSeparateAudioFilePath = "output_audio"
};
2.4 Frame Descriptor
Provide all frame descriptor inputs in one place:
settings.frameDescriptorSettings = new FrameDescriptorSettings() {
    frameDescriptorColorFormat = RenderTextureFormat.ARGB32,
    useFrameDescriptorSrgb = true,
    frameDescriptorMsaaSamples = 1
};
Note
We recommend not changing the Frame Descriptor Settings unless you have specific tasks. It is configured for stable operation by default.
3. Updated class reference (high-level)
3.1 Universal Video Recorder (public surface)
- Lifecycle: OnEnable() calls NSRVideoRecorder.Init() and OnDisable() disposes. Update() forwards processing to the engine.
- Recording: StartVideoRecorder(...), StopVideoRecorder(), PauseVideoRecorder(), ResumeVideoRecorder(). Each delegates to engine and performs microphone permission/start/stop as needed.
- Setup: SetUpRecorder() builds a single settings object (cameras, resolution, frame rate, bitrates, audio options, frame descriptor SRGB) and applies per-platform SOs.
- Preview: Preview() launches a fullscreen movie on mobile using recorded path.
3.2 Watermark
- Subscribes to NSRVideoRecorder.onFrameRender and overlays watermark with optional safe GPU blit to mitigate flicker on Metal/URP. Includes auto size to aspect for the watermark texture.
3.3 Sample helpers
- Handheld preview: subscribes to completion, shows captured preview image. Now reads path/events from nested engine.
- Player preview: creates a VideoPlayer with a RenderTexture, adjusts aspect, play/pause toggle; now also uses nested engine path/events.
Changelog
Expand
## [2.0.4]
### Updated
- Universal Video Recorder;
- NSR Libraries;
- NSR Frameworks;
- Documentation;
### Fixed
- Minor bugs;

## [2.0.3]
### Added
- Ability to change the title of the “Share” window (Android);
### Updated
- Improved asynchronous/synchronous frame/sample reading;
- Improved Multithreaded Rendering;
- Extended support for improved video recording for Built-in/URP/SRP Render Pipeline (across different versions and generations);
- Improved stability when using AR Foundation;
- Improved stability for Unity Engine versions: 2019.x, 2020.x, 2021.x, 2022.x, 2023.x, 6000+;
- Video Preview (VideoPlayer & Handheld);
- Universal Video Recorder;
- NSR Libraries;
- NSR Frameworks;
- Share utility;
- Gallery utility;
- Utilities;
- Documentation;
### Fixed
- Fixed a recording error when multithreaded rendering was disabled;
- Minor bugs;

## [2.0.2]
### Updated
- Universal Video Recorder;
- NSR Libraries;
- NSR Frameworks;
- NSR Video codecs;
- NSR Audio codecs;
- Optimizing video recording;
- Enhanced multithreaded rendering;
- Documentation;
### Fixed
- Minor bugs;

## [2.0.1]
### Added:
- Application Entry Point support - Activity/GameActivity (Android);
- Automatic configuration of Unity project for video recording;
### Updated
- Universal Video Recorder;
- Native Screen Recorder;
- NSR Libraries;
- NSR Frameworks;
- Documentation;
### Fixed
- Minor bugs;

## [2.0.0]
### Added:
- New video formats for Android: MP4, WEBM, 3GP;
- New video codecs for Android: VP8, VP9, AVC - H.264, H.265 (HEVC), MPEG4, H263;
- New audio codecs for Android: AAC, AAC (LC), AAC (HE_V1), AAC (HE_V2), AAC (ELD), AAC (XHE), VORBIS, OPUS;
- Support 16 KB page sizes (Android);
- New video formats for iOS: MP4, MOV, M4V, 3GP, 3GPP, MPEG4;
- New video codecs for iOS: H.264, H.265 (HEVC), H.265 (HEVCWithAlpha), Apple ProRes 4444, Apple ProRes 4444 XQ, Apple ProRes 422, Apple ProRes 422 HQ, Apple ProRes 422 LT, Apple ProRes 422 Proxy, JPEG, JPEGXL, MotionJPEG, MPEG4Video;
- New audio codecs for iOS: LinearPCM, AAC, AAC (LD), AAC (ELD), AAC (ELD_SBR), AAC (ELD_V2), Apple Lossless, OPUS;
- New video formats for macOS: MP4, MOV, M4V, 3GP, 3GPP, MPEG4;
- New video codecs for macOS: H.264, H.265 (HEVC), H.265 (HEVCWithAlpha), Apple ProRes 4444, Apple ProRes 4444 XQ, Apple ProRes 422, Apple ProRes 422 HQ, Apple ProRes 422 LT, Apple ProRes 422 Proxy, JPEG, JPEGXL, MotionJPEG, MPEG4Video;
- New audio codecs for macOS: LinearPCM, AAC, AAC (LD), AAC (ELD), AAC (ELD_SBR), AAC (ELD_V2), Apple Lossless, OPUS;
- New video formats for Windows: MP4, M4V;
- New video codecs for Windows: H.264, H.265 (HEVC);
- New audio codecs for Windows: AAC, AAC (LC);
- New recorder settings classes;
- ScriptableObjects presets (per platform);
- Separated and added the NSR Video Recorder class (extension for customization and creation of custom recorder systems);
- Recording video with audio from the scene for Unity Editor;
- Recording video with audio from the microphone for Unity Editor;
- Recording video with audio simultaneously from the microphone and scene for Unity Editor;
### Updated
- Universal Video Recorder;
- Native Screen Recorder;
- Editor Recorder;
- NSR Core Libraries;
- NSR Video formats;
- NSR Video codecs;
- NSR Audio codecs;
- NSR Libraries;
- NSR Watermark;
- Optimizing video recording;
- Updated support for Unity 6+ features;
- Updated Input System support (Both);
- Utilities;
- Examples;
- Documentation;
### Fixed
- Fixed the preview frame (first frame) of a video on macOS/iOS when it could be dark or transparent;
- Minor bugs;

## [1.8.2]
### Updated
- Native Screen Recorder;
- NSR Core Libraries;
- NSR Libraries;
- Improved presentation handling (safe rotation);
- Stability improvements for Native Screen Recorder initialization;
- Utilities;
- Documentation;
### Fixed
- Popover/Share presentation issue after screen orientation change (iOS);
- Minor bugs;

## [1.8.1]
### Added:
- Extended support for older versions of Unity;
- Improvements for Unity 6+ versions;
- dSYM;
### Updated
- Graphic Provider & Subsystem;
- Universal Video Recorder;
- Editor Recorder;
- NSR Libraries;
- Utilities;
- Documentation;
### Fixed
- Warning about missing dSYM in Xcode;
- Minor bugs;

## [1.8.0]
### Added:
- Safe GPU Blit for Watermark;
- Dynamic adaptation of the video frame rate to the device and app performance;
### Updated
- Universal Video Recorder;
- Optimizing video recording;
- Frame encoding method;
- NSR Libraries;
- Watermark;
- Documentation;
### Fixed
- Flickering or rendering artifacts when using watermark (Metal);
- Frame rate change for certain devices;
- Minor bugs;

## [1.7.3]
### Updated
- Universal Video Recorder;
- Custom Frame Processor;
- Utility Libraries;
- NSR Libraries;
- Documentation;
### Fixed
- Minor bugs;

## [1.7.2]
### Added:
- Watermark;
- Custom Frame Processor;
- An example of using a watermark;
- An example of a multi-scene recording;
- Record audio for the Editor Recorder;
- Events for working with video recording frames;
- Support for GPU & CPU operations for Editor Recorder;
- Support for asynchronous operations for Editor Recorder;
- A new asynchronous solution for a webcam (WebCamUITextureAsync);
### Updated
- Universal Video Recorder;
- Editor Recorder;
- NSR Core Libraries;
- Expanded range of settings and options;
- Documentation;
- Examples;
### Fixed
- Fixed a bug with no vibration after using the Microphone() function;
- Minor bugs;

## [1.7.1]
### Added:
- Audio Receiver component;
- Additional options for working with audio;
- New features for working with a microphone;
### Updated
- Universal Video Recorder;
- Editor Recorder;
- NSR Core Libraries;
- NSR Utility Libraries;
- Audio recording subsystem;
- Expanded range of settings and options;
- Documentation;
- Examples;
### Fixed
- Microphone echo when recording audio with additional audio sources;
- Minor bugs;

## [1.7.0]
### Added:
- Custom video resolution option;
- Ability to change the path to save to the gallery (Android);
- New Actions for tracking the status of a video recording;
- Ability to customize the video resolution for any device orientation (portrait / landscape);
- Video Preview Component (VideoPlayer);
- Video Preview Component (Handheld);
- Video timer sample (Text);
### Updated
- Universal Video Recorder;
- Editor Recorder;
- NSR Core Libraries;
- NSR Utility Libraries;
- Gallery & Gallery Extensions;
- Preview Video Manager;
- Color spaces (Gamma and Linear);
- Expanded range of settings and options;
- Optimization of the plugin;
- sRGB & HDR options;
- Library structure;
- Documentation;
- Examples;
### Fixed
- Minor bugs;

## [1.6.0]
### Added:
- Scripting Define Symbols (NSR_MICROPHONE_DISABLE, NSR_CAMERA_DISABLE);
- The ability to manage permissions;
- Share Extensions;
- Gallery Extensions;
- File Saver;
### Updated
- Universal Video Recorder;
- NSR Core Libraries;
- Library structure;
- Graphic Provider & Subsystem;
- Shared Graphic;
- Shared Graphic (Extended functionality of the path to the output file);
- The recording length of a separate audio file has been increased;
- Microphone Audio (Input & Recorder);
- Separate audio file;
- Permission Helper;
- Documentation;
- Examples;
### Fixed
- Minor bugs;

## [1.5.4]
### Added:
- Dynamic camera changes when recording video (all platforms & Editor);
- An example of a scene with a dynamic camera change;
- New options for saving video and audio files;
### Updated
- Universal Video Recorder;
- NSR Core Libraries;
- Editor recorder;
- Documentation;
- Examples;
### Fixed
- Minor bugs;

## [1.5.3]
### Added:
- Dynamic camera changes when recording video (all platforms & Editor);
- An example of a scene with a dynamic camera change;
- New options for saving video and audio files;
### Updated
- Universal Video Recorder;
- NSR Core Libraries;
- Editor recorder;
- Documentation;
- Examples;
### Fixed
- Minor bugs;

## [1.5.2]
### Added:
- Callback function (UnityAction) for the Gallery utility;
- Verification of the plugin at application launch;
### Updated
- Optimization of the plugin;
- Universal Video Recorder;
- NSR Core Libraries;
- Editor recorder;
- Examples;
### Fixed
- Fixed a delay during plugin initialization;
- Minor bugs;

## [1.5.1]
### Updated
- Universal Video Recorder;
- Windows encoder;
- Video corders;
- NSR Core Libraries;
- Editor recorder;
### Fixed
- Re-record video in the Unity editor bugs;
- Recording without a microphone for the Windows platform bugs;
- Minor bugs;

## [1.5.0]
### Added
- Microphone Audio Recorder;
- Record individual audio files;
- Separate an audio file from a recorded video;
- Scene example for recording separate video files;
- New options for recording video;
### Updated
- Simplifying the process of adding a custom path for video and audio files;
- Updated interface;
- Optimization of the plugin;
- Optimization of video recording on Windows and macOS platforms;
- Reduced load when recording video;
- Updating the first black frame of the video;
- Expanded range of settings and options;
- Universal Video Recorder;
- File Manager;
- Video Corders;
- NSR Core Libraries;
- Editor Encoders;
- Examples;
- Documentation;
### Fixed
- Minor bugs;

## [1.4.4]
### Updated
- Universal Video Recorder;
- Video Corders;
- NSR Libraries;
### Fixed
- Minor bugs;

## [1.4.3]
### Updated
- Universal Video Recorder;
- Video Corders;
- NSR Libraries;
- Plugin validation function;
- Optimization of the plugin;
### Fixed
- Minor bugs;

## [1.4.2]
### Added
- Advanced video settings;
### Updated
- Universal Video Recorder;
- Video Corders;
- NSR Libraries;
- The "Bitrate" property for video settings;
### Fixed
- Minor bugs;

## [1.4.1]
### Added
- Advanced sound settings;
- The "Sample rate" property for audio settings;
- The "Channel count" property for audio settings;
- The "Bitrate" property for audio settings;
- New examples;
### Updated
- Universal Video Recorder;
- Video Corders;
- NSR Libraries;
- Plugin validation function;
- The function of skipping frames during video recording;
- Graphic Provider (Screenshot & Image system);
- Optimization of the plugin;
### Fixed
- Video recording on Windows and macOS platforms;
- Auto-detection of bitrate;
- Screen recording with UI layer (Screen Space - Camera or World Space);
- Minor bugs;

## [1.4.0]
### Added
- Transparent video recording sample (Editor Recorder);
- Utility for saving photos and videos to the Gallery (iOS, iPadOS, Android);
- Utility for sharing any files, videos, images and e.t.c (iOS, iPadOS, Android);
- File manager utility;
- The function of skipping frames during video recording;
- File management & Share & Save to gallery - examples;
### Updated
- Universal Video Recorder;
- Editor Encoders;
- NSR Libraries;
- Editor Corder;
- Examples of interaction with the plugin;
- Optimization of the plugin;
### Fixed
- Recording video in Unity Editor for Windows;
- Minor bugs;

## [1.3.13]
### Added
- Transparent video recording (Editor Recorder);
- Transparent video formats .mp4, .webm (Editor Recorder);
### Updated
- Different resolutions (LR, VHS, LD, SD, HD, FHD, QHD, UHD);
- Universal Video Recorder;
- Video resolution settings;
- Editor H264 Encoder;
- Editor VP8 Encoder;
- Editor Corder;
- Video Recorders;
### Fixed
- Minor bugs;

## [1.3.12]
### Added
- Different resolutions (SD, HD, FHD, QHD, UHD);
- Automatically detects safe video resolution;
### Updated
- Universal Video Recorder;
- Video resolution settings;
- Resolution divide function;
- Audio Settings;
- Video Recorders;
- A simple camera example;
### Fixed
- Minor bugs;

## [1.3.11]
### Added
- Editor VP8 Encoder;
### Updated
- Universal Video Recorder;
- Video Recorders;
- WebCam Texture;
- Editor H264 Encoder;
### Fixed
- Editor Recorders;
- Minor bugs;

## [1.3.10]
### Updated
- Graphic Provider (Screenshot & Image system);
- Editor Corder;
### Fixed
- Editor Recorders;
- Graphic Provider (XR);
- Minor bugs;

## [1.3.9]
### Added
- RenderTexture video recording settings;
- RenderTexture video recording sample;
### Updated
- Graphic Provider (Screenshot & Image system);
- Universal Video Recorder;
- Video Recorders;
- Editor Corder;
- Optimization of the plugin;
- Documentation;
### Fixed
- Minor bugs;

## [1.3.8]
### Added
- HDR (high dynamic range) support;
### Updated
- Editor Corder;
- Video Recorders;
- Universal Video Recorder;
- Graphic Provider (Screenshot & Image system);
### Fixed
- Minor bugs;

## [1.3.7]
### Added
- Editor Corder;
- Graphic Provider (Screenshot & Image system);
- Example of a graphic provider;
### Updated
- Video Recorders;
- Universal Video Recorder;
### Fixed
- Minor bugs;
- Corder bugs;

## [1.3.6]
### Added
- Async Tasks;
- NSR validate function;
### Updated
- Video Recorders;
- Microphone solution (Windows/macOS);
### Fixed
- Minor bugs;

## [1.3.5]
### Added
- A simple camera example;
- Image effects;
- Shaders;
- Audio;
### Updated
- Video Recorders;
- Microphone solution;
- Optimization of the plugin;
### Fixed
- Minor bugs;

## [1.3.4]
### Added
- Audio settings;
- Audio Input type;
- Record params;
### Updated
- Video Recorders;
- Audio Input;
- Microphone solution;
- Audio system;
- Optimization of the plugin;
### Fixed
- Minor bugs;
- Build bugs;

## [1.3.3]
### Updated
- Native Video Recorder;
- Frameworks;
- Internal Corder;
- iOS version support;
### Fixed
- Minor bugs;

## [1.3.2]
### Added
- HEVC codec;
### Updated
- Universal Video Recorder;
- Internal Corder;
- Method of dividing video resolution;
### Fixed
- Minor bugs;

## [1.3.1]
### Added
- Dynamic scene (sample);
- Hold and Record (sample);
### Updated
- Universal Video Recorder;
- Android library;
### Fixed
- Minor bugs;

## [1.3.0]
### Added
- Windows support;
- macOS support;
### Updated
- Universal Video Recorder;
- Optimization of the plugin;
- Examples;
### Fixed
- Minor bugs;

## [1.2.1]
### Added
- Automatically pause/resume video recording during program focus/pause;
- Custom frame rate;
### Updated
- Universal Video Recorder;
### Fixed
- Pause/Resume video recording function;
- Microphone echo;
- Optimization of the plugin;
- Minor bugs;

## [1.2.0]
### Added
- Pause/Resume video recording function;
### Updated
- Rename output video file function;
- Save output video file function;
### Fixed
- Minor bugs;

## [1.1.1]
### Added
- Updated NSR - Screen Recorder;
- Updated Corder;

## [1.1.0]
### Added
- Added Android support;
- Added Universal Screen Recorder;
- Updated NSR - Screen Recorder;

## [1.0.0]
### Added
 - Release;
Issues
Issues are used to track errors, bugs, etc.
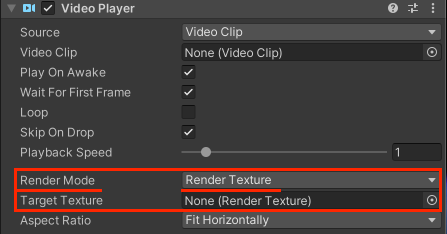
The output video file is black or without sound when using Unity VideoPlayer.
Full description of the error:
When recording video with VideoPlayer (Unity), the output video file is black or without sound.
Cause of the error
This is due to incorrect settings of Unity VideoPlayer.
Fix:
Solving audio recording:
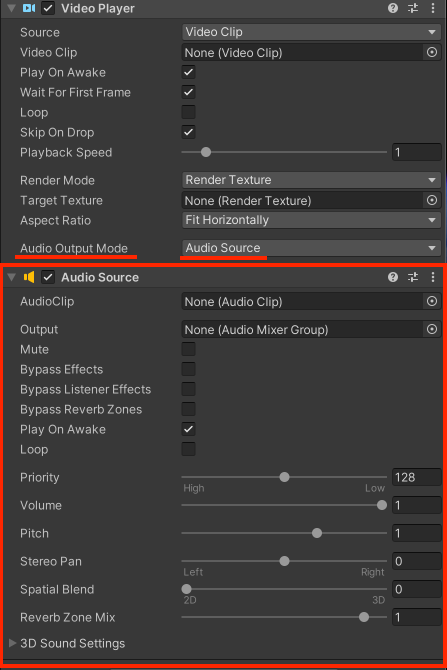
In order for the sound to get to the stage properly, please set the “Audio Output Mode = AudioSource” parameter. Then add the AudioSource to this component. We have attached a picture that shows how it looks like.
If you set the type to Direct, then Audio samples are sent directly to the audio output hardware, bypassing Unity's audio processing.
For more information, see the official Unity documentation.
Solving video frame recording:
To ensure that video frames are rendered properly, set the “Render Mode = RenderTexture” parameter. Then add a RenderTexture to this component. We have attached an image that shows what it looks like.
Save in the gallery “Write permission” to “External” (Android version 13+, etc.)
Full description of the error:
The video is visible in the persistentDataPath folder, but when I try to save it to the gallery, no popup appears asking for external storage permission, so the video is not visible in the gallery. I have already set the “Write Permission” to “External” in the Android player settings while creating the apk.
Updated Permissions Model in Android 13+
Starting with Android 10 (API 29), and with further restrictions in Android 13 (API 33+), Google introduced Scoped Storage. As part of these changes, WRITE_EXTERNAL_STORAGE is effectively deprecated for newer Android versions. The OS no longer prompts for it, instead requiring more targeted permissions (e.g., READ_MEDIA_VIDEO) or the use of the MediaStore API for managing media files. Consequently, you will not see a toggle for external storage write permissions in the system settings on Android 13+, and no runtime dialog will appear requesting it. Declaring WRITE_EXTERNAL_STORAGE in Unity’s Player Settings In older Unity versions, setting “Write Permission” = “External (SDCard)” (under Player Settings > Publishing Settings > Other Settings) automatically added WRITE_EXTERNAL_STORAGE to the manifest. On Android 13+, however, this permission will not function as it once did.
NSR - Screen Recorder already uses the MediaStore API, ensuring compatibility with the latest Android storage requirements. This approach allows recorded videos to appear in the user’s gallery without needing broad external storage permissions.
Fix:
Important Note on AndroidManifest Edits
If you have manually added or changed permissions in your AndroidManifest.xml, please remove or revert these edits. Our plugin automatically includes all necessary permissions and configurations to function properly. Conflicting entries can lead to unexpected behavior.
If the user denies the permission request (or chooses “Don’t ask again”) the first time, newer Android versions no longer show a standard permission prompt on subsequent tries. In that case, the only way to grant the permission is through the system’s device settings.
Below is a simplified approach to redirect the user to your app’s settings page immediately after a denial:
(the code is provided for demonstration purposes, you can adapt it for your own purposes)
using UnityEngine;
using UnityEngine.Android;
using System.Collections;

public class PermissionHandler : MonoBehaviour
{
    public void StartPermissionCheck()
    {
        StartCoroutine(CheckPermissionAndRedirectCoroutine());
    }

    private IEnumerator CheckPermissionAndRedirectCoroutine()
    {
        // If permission isn't granted yet, request it
        if (!Permission.HasUserAuthorizedPermission(Permission.ExternalStorageWrite))
        {
            Permission.RequestUserPermission(Permission.ExternalStorageWrite);

            // Wait a short time or a few frames to allow the system prompt (if shown)
            // to complete. Adjust the duration as needed.
            yield return new WaitForSeconds(1f);

            // Check again if permission is still not granted
            if (!Permission.HasUserAuthorizedPermission(Permission.ExternalStorageWrite))
            {
                // Open the settings page for your app
                OpenAppSettings();
                yield break;
            }
        }

        // Permission is granted
        Debug.Log("Permission granted, proceed with recording or saving files.");
    }

    private void OpenAppSettings()
    {
        using (var uriClass = new AndroidJavaClass("android.net.Uri"))
        using (var intent = new AndroidJavaObject("android.content.Intent",
            "android.settings.APPLICATION_DETAILS_SETTINGS"))
        {
            string packageName = Application.identifier; // or Application.bundleIdentifier in older Unity
            AndroidJavaObject uriObject = uriClass.CallStatic(
                "fromParts", "package", packageName, null);

            intent.Call("setData", uriObject);

            // Start the activity
            using (var unityPlayer = new AndroidJavaClass("com.unity3d.player.UnityPlayer"))
            using (var currentActivity = unityPlayer.GetStatic("currentActivity"))
            {
                currentActivity.Call("startActivity", intent);
            }
        }
    }
}
Red Video Issue (Amazon Fire Tablet Fire7)
Full description of the error:
The captured video is all red with just audio.
Cause of the error
On Amazon Fire devices, there can sometimes be compatibility issues with the codec or hardware acceleration. Please check that all required Android packages are installed and that you are not using a non-standard graphics API or “Graphics Jobs” in Unity that may interfere with the recording. We also recommend experimenting with different recording modes (e.g., changing the bitrate or resolution settings) to see if that resolves the red video issue.
Fix:
To solve the problem, you need to change the Resolution to HD (or another) and increase or decrease the video bitrate.
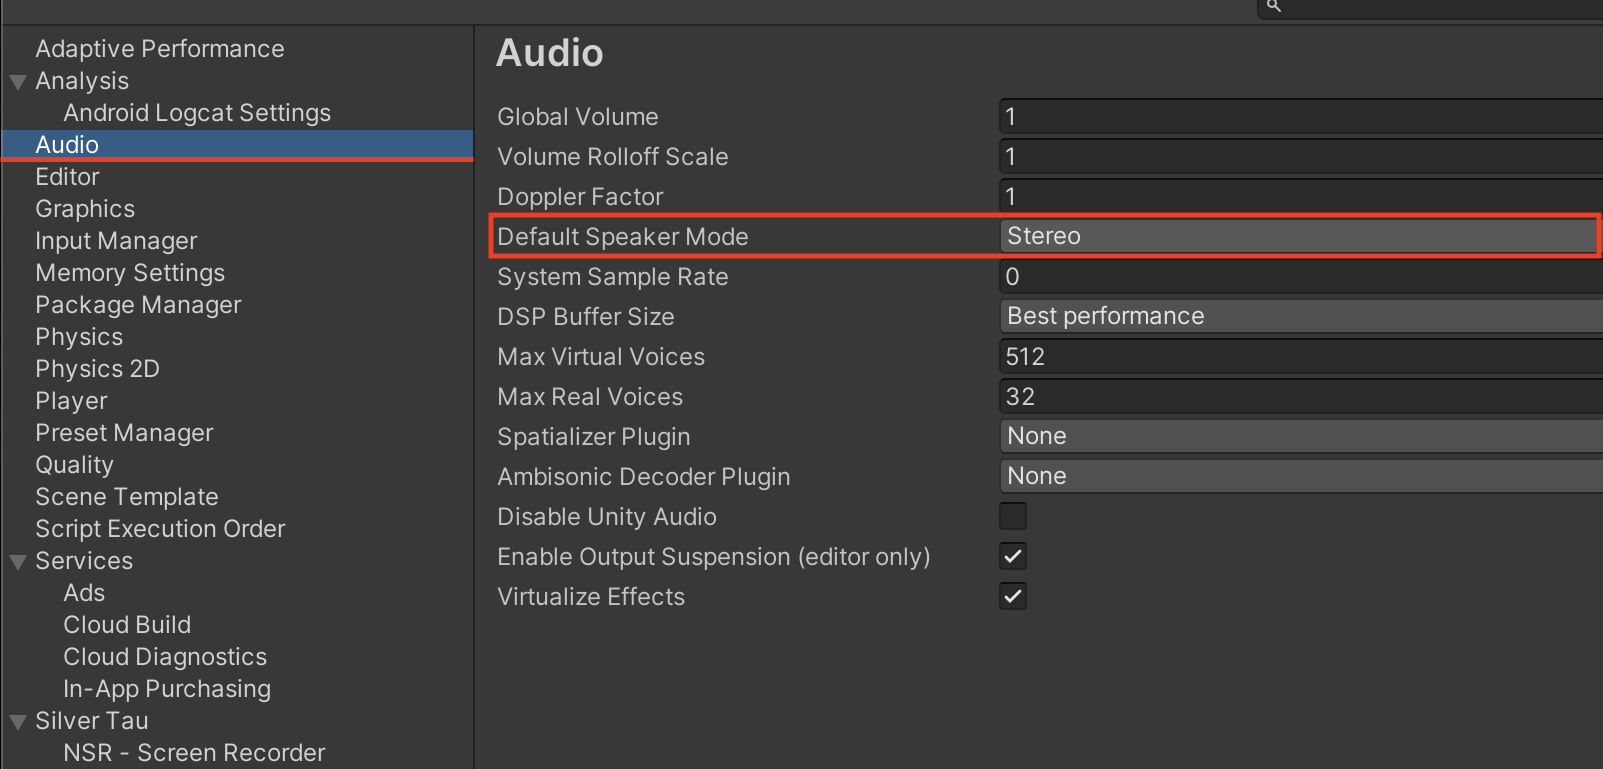
AudioChannelLayout channel count does not match AVNumberOfChannelsKey channel count
Full description of the error:
*** -[AVAssetWriterInput initWithMediaType:outputSettings:sourceFormatHint:] AudioChannelLayout channel count does not match AVNumberOfChannelsKey channel count.
Cause of the error
This is a fairly common error. The reason for the error is that you are trying to record audio without the provided audio channels.
Fix:
To fix the error, you need to change the value for Default Speaker Mode. Go to Player Settings -> Audio -> Default Speaker Mode and set the Stereo option.
FPS drops on Windows or Mac OS platform
Full description:
When I record a video on the Windows or macOS platform, the fps drops critically.
Cause of the error
The reason is in the project settings, namely VSync count and Compute Skinning.
Fix:
Go to Project Settings.
Set the following project parameters:
- VSync count -> Every V Blank or Don't Sync
- Compute Skinning -> true or false
Enable/Disable GPU Skinning
The first tip involves a setting that eases the burden on the CPU or GPU Front End at the expense of the other, that is, GPU Skinning. Skinning is the process where mesh vertices are transformed based on the current location of their animated bones. The animation system, working on the CPU, transforms the object's bones that are used to determine its current pose, but the next important step in the animation process is wrapping the mesh vertices around those bones to place the mesh in the final pose. This is achieved by iterating over each vertex and performing a weighted average against the bones connected to those vertices.
This vertex processing task can either take place on the CPU or within the Front End.
Video Output Appears Too Dark (Color Space)
Full description:
When using Linear color space in Unity on Android, recorded videos (especially with H.264 or VP8 codecs) may appear darker than the original screen, despite correct colors in the Editor or PC builds.
Cause of the error
This issue is caused by how color values are handled between Unity's linear rendering pipeline and the encoder's expected sRGB inputs on certain Android devices.
Fix:
A reliable workaround has been confirmed by a user and verified internally:
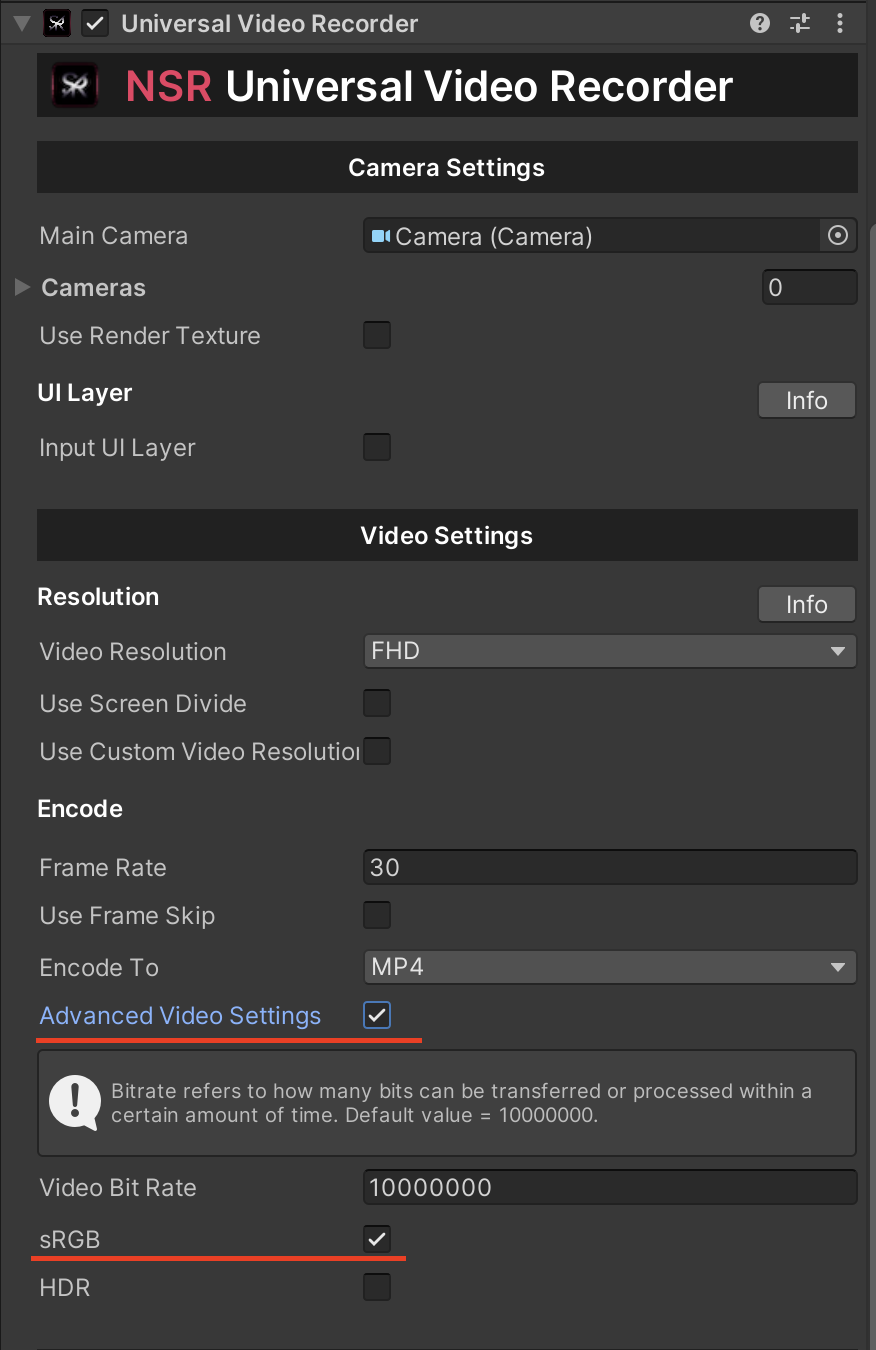
1. Set the RenderTexture format to R8G8B8A8_SRGB.
This ensures the output texture uses sRGB color space, which the encoder expects.
2. Enable the following flag in your recorder settings:
recorder.useFrameDescriptorSrgb = true;
This instructs NSR to generate a FrameDescriptor that matches the sRGB layout, preserving brightness and gamma more accurately during capture.
You can also find this setting in the UniversalVideoRecorder Inspector.
Example Configuration:
recorder.renderTexture = renderTexture;
recorder.useFrameDescriptorSrgb = true;
Tested Setup (User Example)
- Unity: 6.0.0 (6000.0.45f)
- Device: Samsung Galaxy Buddy (SM-A226L)
- Android: Version 13
- Codec: H.264 (baseline), MP4 format
- RenderTexture Settings: sRGB format enabled
- Result: Video output matches the original screen brightness
Note
This issue is rare and usually occurs only on devices where the hardware encoder makes assumptions about incoming color space.
The fix has been added to the NSR - Screen Recorder v1.6.0+ update, which supports more control over FrameDescriptor settings.
Audio causing speed-up / choppy playback / slowdown when recording video
Full description:
When recording video with audio, the audio is distorted and does not correspond to what is being played or coming from different sources (audio from the stage or microphone).
Cause of the error
This usually happens when the Unity Audio System - Sample Rate does not match the recording output. This is caused by an incomplete Unity project configuration, specifically the audio stage of your project.
Fix:
Please set the following in your Unity project:
Unity → Project Settings → Player → Audio → System Sample Rate → set to 48000 Hz
(or use the exact same value you're using in UniversalVideoRecorder settings)
